Watering moss can be a tedious task, but with a little ingenuity, you can make your own self watering moss pole. This project is easy to set up and requires very little time.
The supplies are also cheap and can usually make multiple moss poles from a single pvc pipe, so it’s a fun DIY project to revisit as your climbing plants search for new places to climb.
I decided to try to make a self watering moss pole via a wicking system after I first made a very dry moss pole with no moisture retention a few months ago.
I’ll walk you through the steps I took, which items I used, and how it has been working for my vining plant so far.
what is a moss pole and what are its benefits?
A moss pole is a long, cylindrical container made from sphagnum moss. It is used to hold plants and promote moisture absorption. Moss poles are often used for climbing plants, as they help to keep the vining plant healthy by providing moisture for the aerial roots to absorb water from.
Aside from providing moisture to the aerial roots, a moss pole provides support for climbing plants that need somewhere to go.
Be warned, though. Depending on the level of humidity where you live, it’s sometimes not all that possible to keep your moss pole moist without some kind of misting. Where I live, here in Mexico, it is extremely dry so I must replenish my moss pole daily (probably twice a day) to keep the moss moist through the wicking system.
Even so, this regular moisture that is available to my little monstera adansonii has made it a very happy little house plant in such a dry climate.
how to make a self-watering moss pole
It’s relatively easy to make a self-watering moss pole. You only need a few materials and it can be done within about 15 minutes. I had to order all of my materials, but they’re cheap and can be used multiple times, so I’m not mad about it.
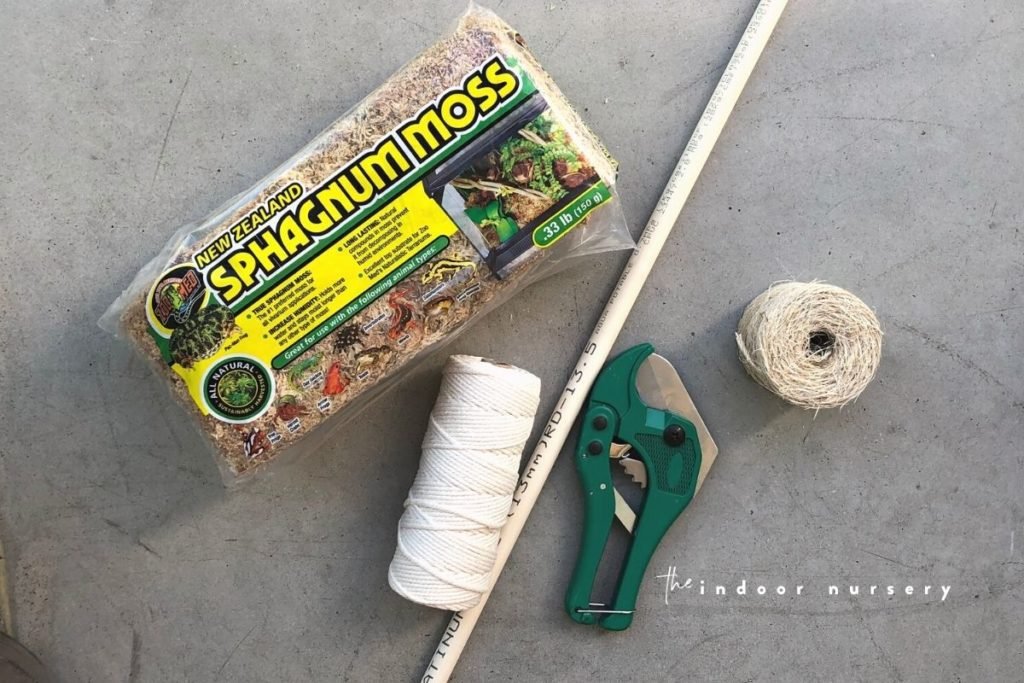
what you need
- pvc pipe (I used 1/2”, though a larger diameter will reserve more water and maybe last longer)
- pvc pipe cap (corresponding 1” cap)
- pvc pipe cutters
- macrame cord
- sphagnum moss, soaked in filtered water
- mesh covering (optional, I didn’t use one)
step 1: cut pvc pipe to desired length
To begin your diy moss pole, cut the pvc pipe to a desired length. Because my plants were small, I chose the 1″ pvc pipe and cut it into about 16″ and 18″ sections. If you have larger plants, then I suggest using 2″ pvc pipe or wider to both provide better stability and reserve more water.
Also consider that you will be stabilizing your sphagnum moss pole in the potting soil, meaning that you will need an extra three to six inches on top of the desired height you’re after.
step 2: put cap on end of pvc pipe
Place the cap on one end of the freshly cut pvc pipe. This will be the end that you bury in potting soil.
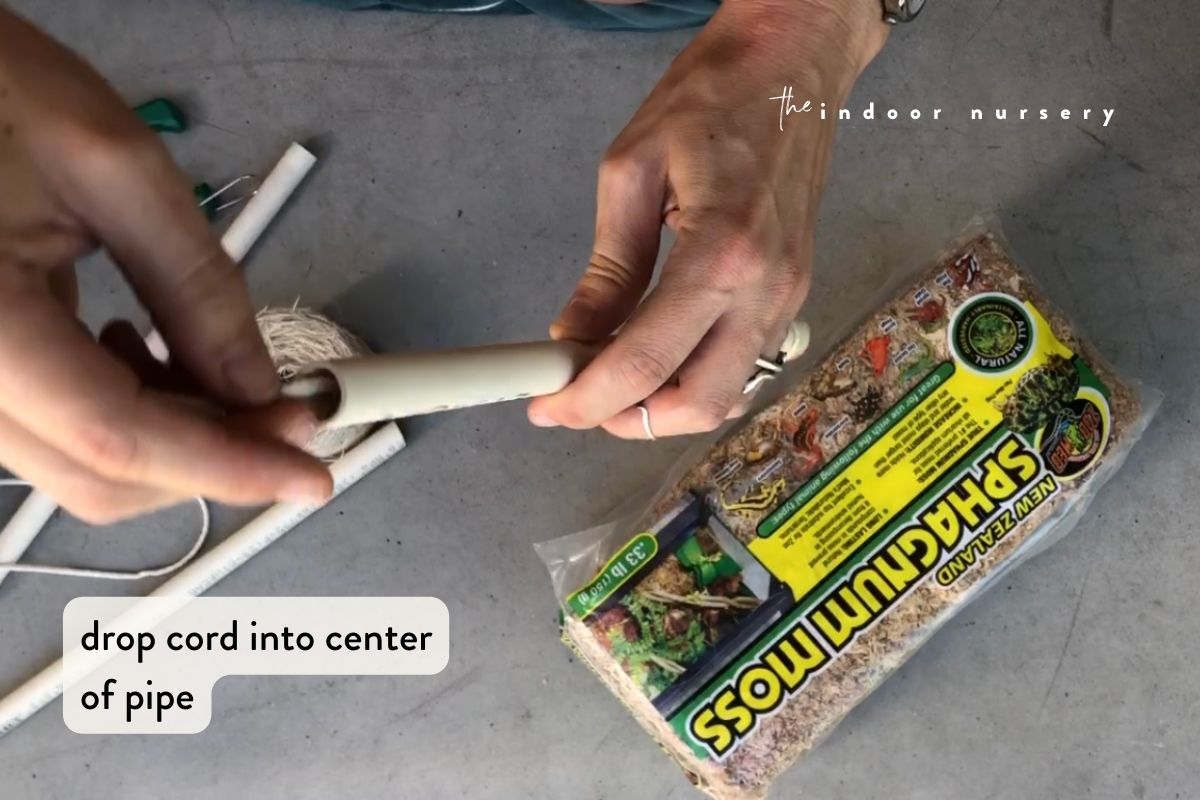
step 3: drop cord into center of pipe
Take one end of your macramé rope/cord and drop it into your pvc pipe, pushing it downward until it reaches the bottom.
This cord is what will keep your moss pole moist as it transfers water from the reservoir in the pvc pipe outward toward the sphagnum moss.
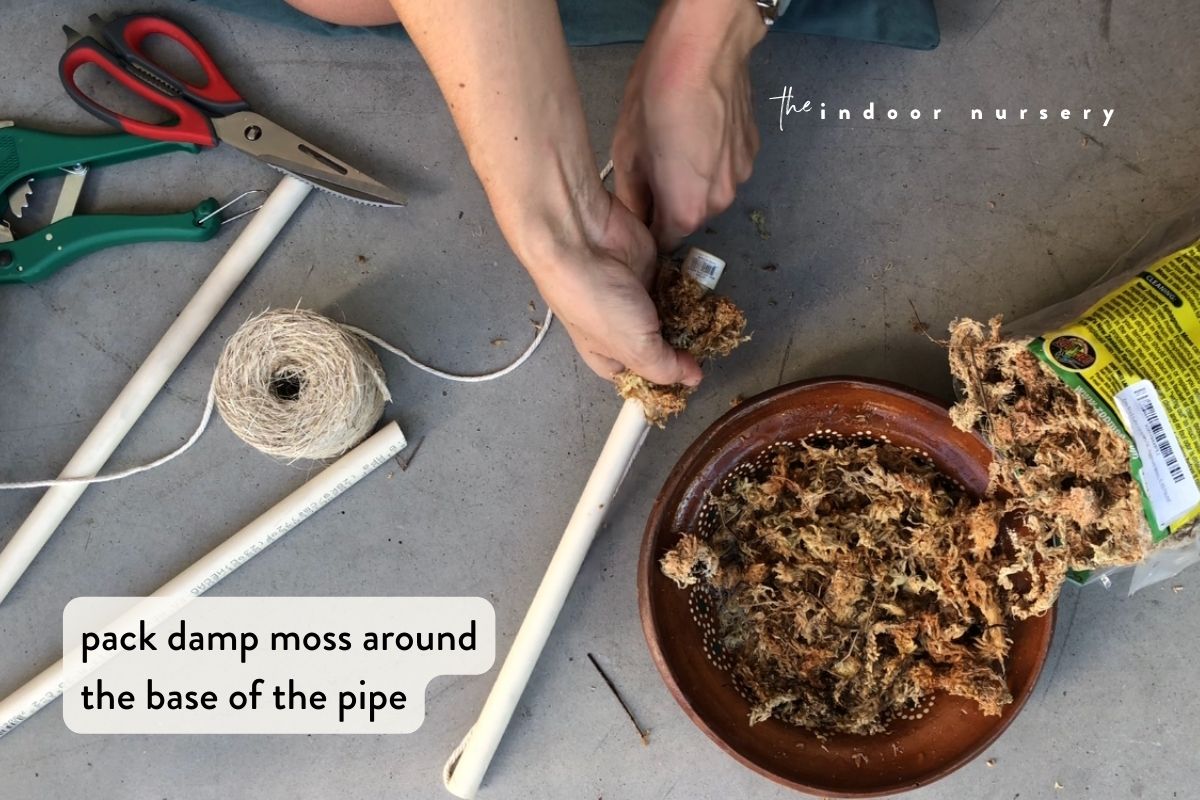
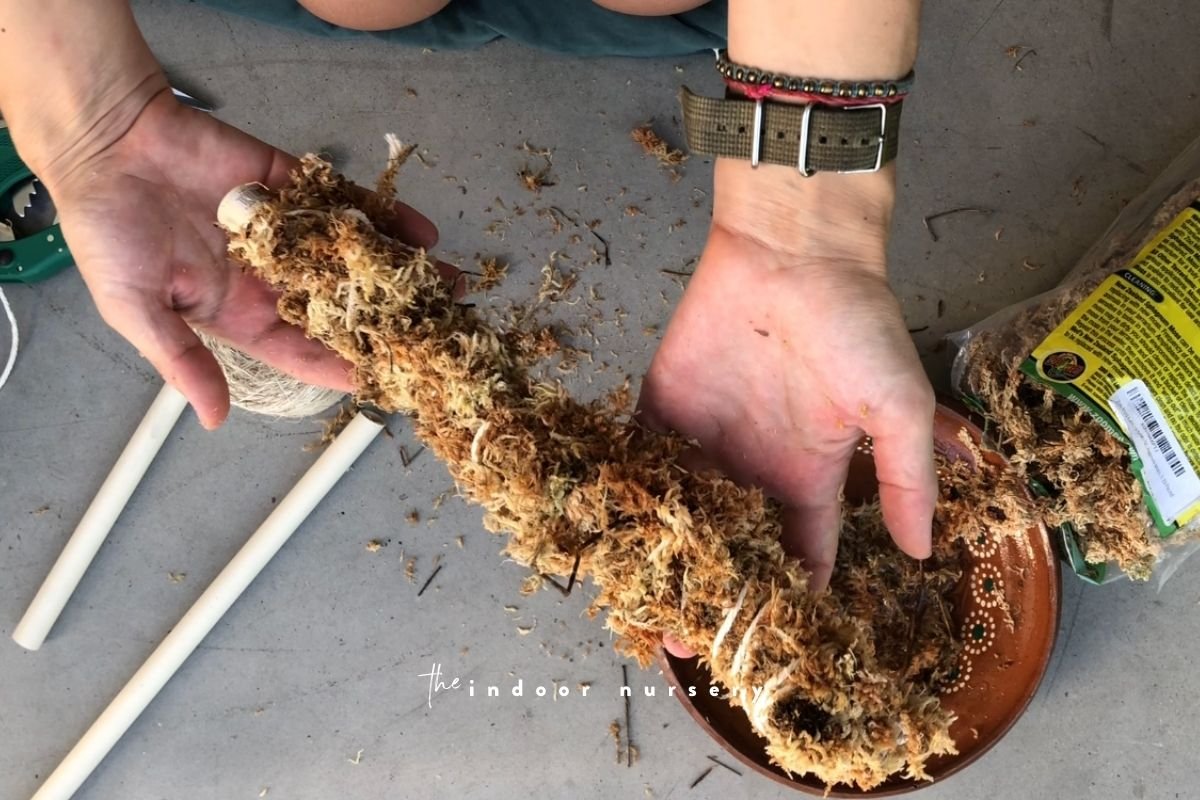
step 4: pad pipe with moss, securing with cord
Now comes the trickiest part and why many people opt for sheet moss. I haven’t used sheet moss myself, but I can see why it would be popular. My sphagnum moss looks a little on the wild side, but that’s alright too 😊
Holding the cord in place, begin wrapping it around your pvc pipe until you finally reach the bottom. (Note: I did not do a wrapping motion, I simple brought my cord straight down to the bottom of the pipe. I’m finding that this hasn’t made the wicking system as effective as wrapping it around the pipe like a candy cane.)
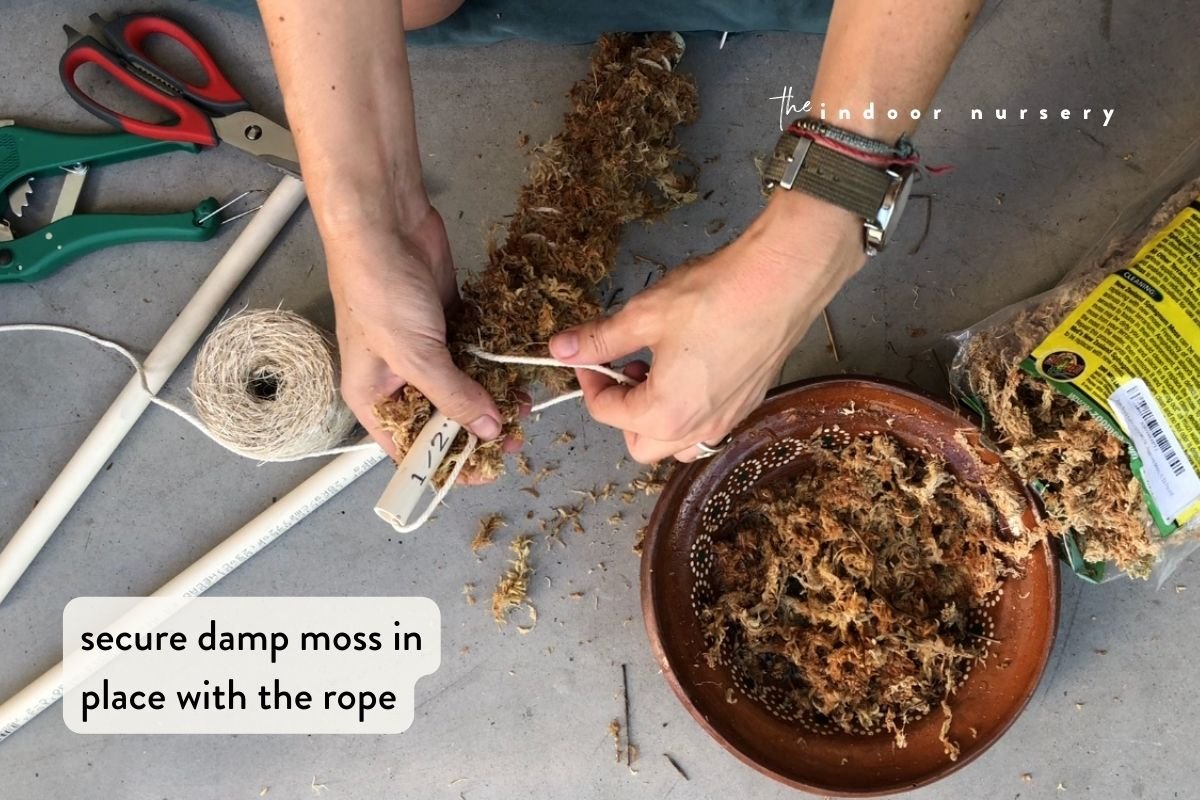
Begin padding the bottom of the pvc pipe with sphagnum moss soaked in filtered water (squeeze excess water out before placing). Some people like to use fishing line as they go to keep everything in place. I wrapped the wet moss once and then repeated this step over and over, working my way upward and finally to the top.
Once you reach the top, either secure everything in place with a fishing line or tie a knot with the cord to hold it in place.
step 5: dig 3” hole into soil & place moss pole securely into hole
Depending on the size of your climbing plant, you’ll want to stabilize the pole by putting it a few inches into the potting soil. Make the hole about an inch wider than the actual moss pole itself, then place the capped end into the hole.
Pad the base of the moss pole with more sphagnum moss. This will help the wicking system pull water into the soil toward the plant roots and vice versa.
Cover with more indoor plant soil and pretty down firmly. Some people like to use a wooden dowel to support the pole.
step 6: wrap your vines around your new moss pole
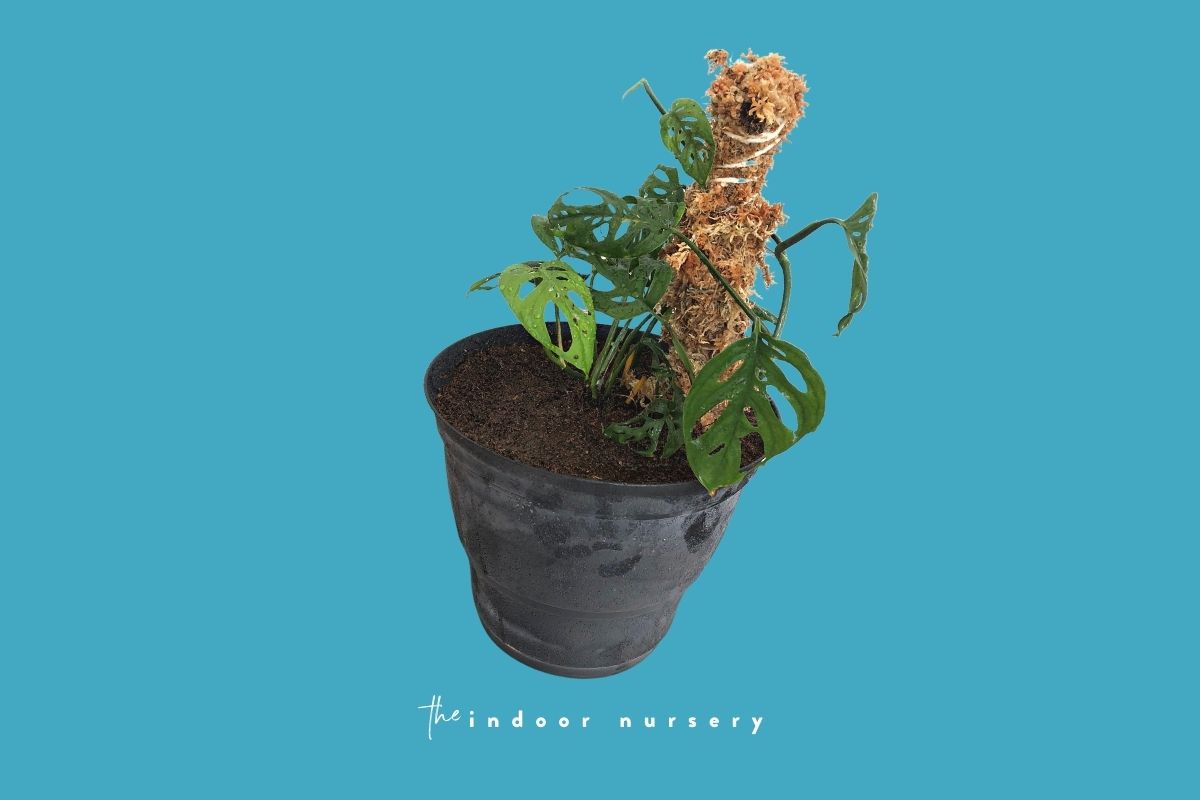
Wrap the plant vines around the moss pole and secure plant ties, if it’s heavy. My mini monstera adansonii is still quite small and rested comfortably on the moist moss pole. It hasn’t put out any aerial roots yet but it has already grown a few new larger leaves!
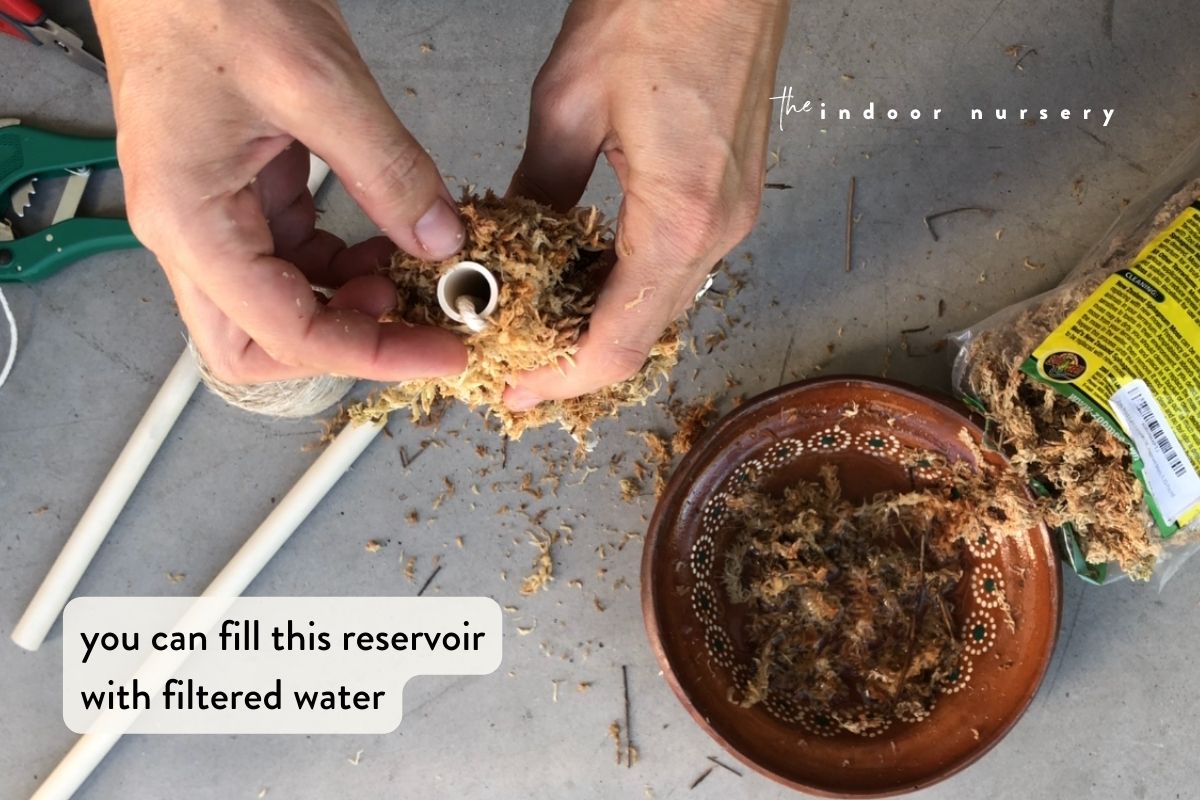
step 7: fill reservoir with water
Fill the reservoir with filtered water and voila, you have a self watering moss pole.
tips and tricks
- this works best in a humid environment. Where I’m currently living, there is not enough humidity in the air to keep the moss moist. I think this is why my monstera adansonii (swiss cheese plant) hasn’t grown any aerial roots yet. To keep the moss moist, I try to keep the water level to the top of the reservoir. As long is there is always a water source for the cord to wick, then your moss will not dry out completely.
- you can use a wire mesh for more stability. Some climbing houseplants can get pretty heavy and so your pole will need extra support. Using wire mesh can do the trick. When using the mesh, wrap it around your peat moss as an outer and final layer and secure it in place with some fishing line. Place the wire mesh into the soil along with the moss pole so it is planted firmly, providing the stability and extra support you need.
- maintain a humid environment. If you’re in a dry place like I am, then consider getting a humidifier to place near your tropical plants. You can easily set the humidifier to a timer so that only periodical mistings occur, which is exactly like the jungle environment that tropical plants like the monstera deliciosa and other climbing plants love.
maintain your moss pole
One thing that I’ve found to be true (and I’m not alone in this feeling) is that self watering moss poles are anything but self watering. You’ll need to replenish the moss pole regularly and provide a moist environment for it to find its equilibrium.
That doesn’t mean that your indoor plants won’t appreciate the effort 😊
Here are some of the questions I had as I was preparing to make my best moss pole yet, and I think you might find my final perspectives helpful. We also asked an expert for some advice on moss poles, which goes into more details about how to use moss poles.
how often do you water moss pole?
I’ve been watering mine daily in the mornings, including a big spray of filtered water on all of the leaves and exposed peat moss. I then refill the reservoir maybe two times per day, basically when I notice but before I stop caring. You’ll need to watch your own moss pole to see how quickly it dries out. I recommend getting a plant humidifier to place near your plants to help lighten the burden of watering it regularly.

how do you stabilize a moss pole?
Some people like using wooden dowels to stabilize the pole. I simply placed mine a few inches into the potting soil for stabilization, though I feel that it could have gone a few inches further (that’s what she said 😏). I’m not sure what the “best” method for stabilizing your moss pole is and I encourage you to test everything out until you find what works for you.
how do you train a plant to climb a moss pole?
Plants grow toward sunlight, or at least the foliage do (plant roots search for water). If you want to teach your climbing plants to grow upward, then you will need the sunlight to be slightly above and in front of them. If you’re placing your climbing plants/moss poles in a cabinet (which would be GREAT for the contained humidity), then putting a grow light on the upper part of the cabinet will help the beautiful foliage grow upward. We wrote a whole DIY guide on how to make a plant cabinet that is a perfect complement to this project.
More How To Guides
- How To Get Rid Of Scale On Plants
- DIY Terrarium Table: How To Make A Table With Plants Inside
- How to Use Leca for Plants: Step-by-Step Guide with Pictures
- How To Use Grow Lights For Indoor Plants
- How To Propagate Peperomia Plants 2 Ways
- DIY Propagation Box With Grow Light
- How To Make Pothos Fuller (In 5 Minutes)
- How to Make a Moss Pole for Your Climbing Plants
- How to Make Potting Soil for Indoor Plants, Plus My Secret Ingredient
- How to Propagate a Split-Leaf Philodendron: Easy Step-by-Step Guide
- Tags:
- DIY
- moss pole
- Peat moss
- sphagnum moss

Marquis *wants* to know how to keep happy and healthy plants, but had a hard time finding information that wasn't written by just another copywriter. After nearly losing one too many plants, it was time to take matters into her own hands. A team of plant scientists and nursery hands was brought together and The Indoor Nursery was born.
Have you thought about drilling a few holes through the pipe, using a nice thick bit of absorbant rope down the middle, then wrapping your pipe in moss? Then, when you water, the moss could wick the water through the holes in the pipe? Just a thought?
Hey, Zoe! Yeah, that’s basically the same thing. Drilling holes in the pipe wouldn’t allow the water to fill the top of the pipe. The rope in this set up I did is supposed to wick to the moss on the outer layer but honestly everything evaporates within a day. I’m not sure I recommend this method. Besides the fact that it’s ugly, it also doesn’t retain water that well. Have you had better luck with other designs? I’m dying to find something that works.
Why does my Monstera plant drip from the leaf points in the morning?
Hey, Esther! I’ve noticed my plants doing the same thing 🙂 Basically, when the temperature is lowest in the early morning, condensation begins to work a little faster than the plant can evaporate water absorbed through the roots. So water droplets form and then gravity pulls them down to the low point of the leaf. I just snapped some beautiful pictures of this and was prepping a blog post all about it, so be on the lookout 🙂