Terrariums are a really fun way to bring the outdoors inside and display some of your favorite plants. A terrarium table is even better because it doubles as a beautiful AND functional piece of furniture.
Plus it is one more way to squeeze plants inside smaller living spaces.
You could have a terrarium coffee table, a terrarium wall table, a terrarium side table or a terrarium night stand. Terrarium tables can be made completely of glass or they can be made from other materials such as wood or metal with only a glass tabletop.
The possibilities are endless and they’re not all that hard to make yourself, either. Here are my step-by-step instructions for making a table with plants inside, aka a terrarium table.
How To Make A Terrarium Table: Step-By-Step Instructions for DIY Terrarium Table
A DIY terrarium table can be as simple or as difficult as you want to make it. The main thing you will need is a basic understanding of plants and create an ideal environment for them indoors. Below I will explain why I chose the layers and the plants I did as we go through the steps for this DIY.
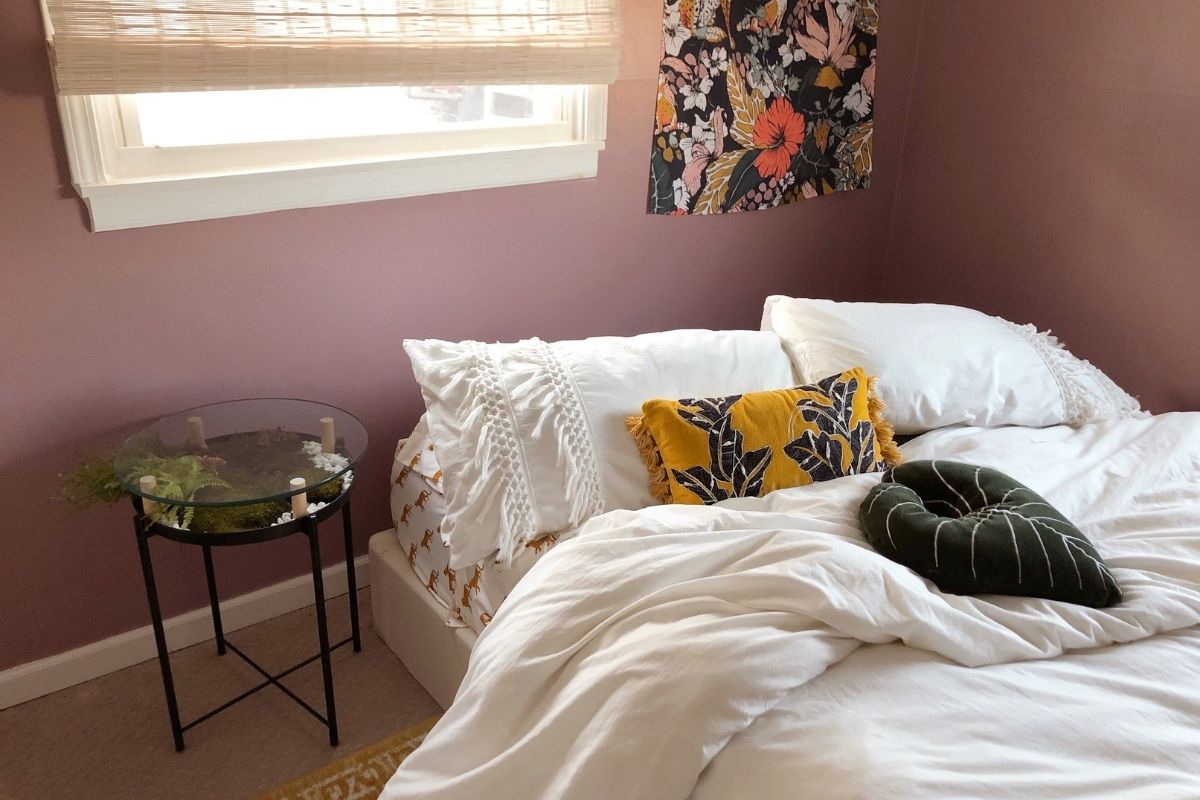
To keep this DIY simple I am using a pre-existing metal side table to create a night stand.
What you’ll need:
- Coffee table or side table (Needs to have some sort of tray so it can hold dirt and plants. Minimum of 1″ deep)
- 4, 3.5″ long wooden dowels (I used scrap 1″ thick dowel that I had laying around)
- Command Strips
- A glass table top that fits your table of choice
- Potting soil ( I used cactus mix)
- Rocks
- Real and/or faux plants
- Fairy garden figures (optional)
How deep should a terrarium table be?
How deep a terrarium container or table needs to be can vary largely based on the type of plants that you will be putting inside your terrarium space. Most sources will tell you that your terrarium needs to be at least 2.5 to 3 inches deep so that plants can root and grow. Deeper is better because it will help keep moisture away from the plant roots and give them space to thrive. However, you can make a coffee table with as little as 1″ in depth work as well. Keep reading to find out how.
What is the best way to layer a glass terrarium table?
One of the best ways to layer a terrarium is:
- Rocks (gravel and or/sand)
- Moss
- Soil
- Decorative layer
Rocks typically go on the bottom to help with drainage. The next layer of moss helps separate the soil from the rocks and absorbs excess moisture. This will also give you those clean lines between the layers that you see in glass terrariums. Soil goes in next then you can add more moss and decorative rocks etc. on top to style it the way you would like.
Step 1: Assemble your table
- Put the table together following the instructions that came with it. Assembly took about 10 minutes or less for me.
I purchased this table off Amazon to use as a base. The tray top is slightly over 1″ deep and I was able to find a glass table top on Amazon that was just about the same in diameter so it was a perfect combo. If you have the time and patience or a larger budget, you could find a different coffee table and topper. Either by thrifting or shopping elsewhere for whatever look you are going for.
Step 2: Cut wooden dowel pieces to size
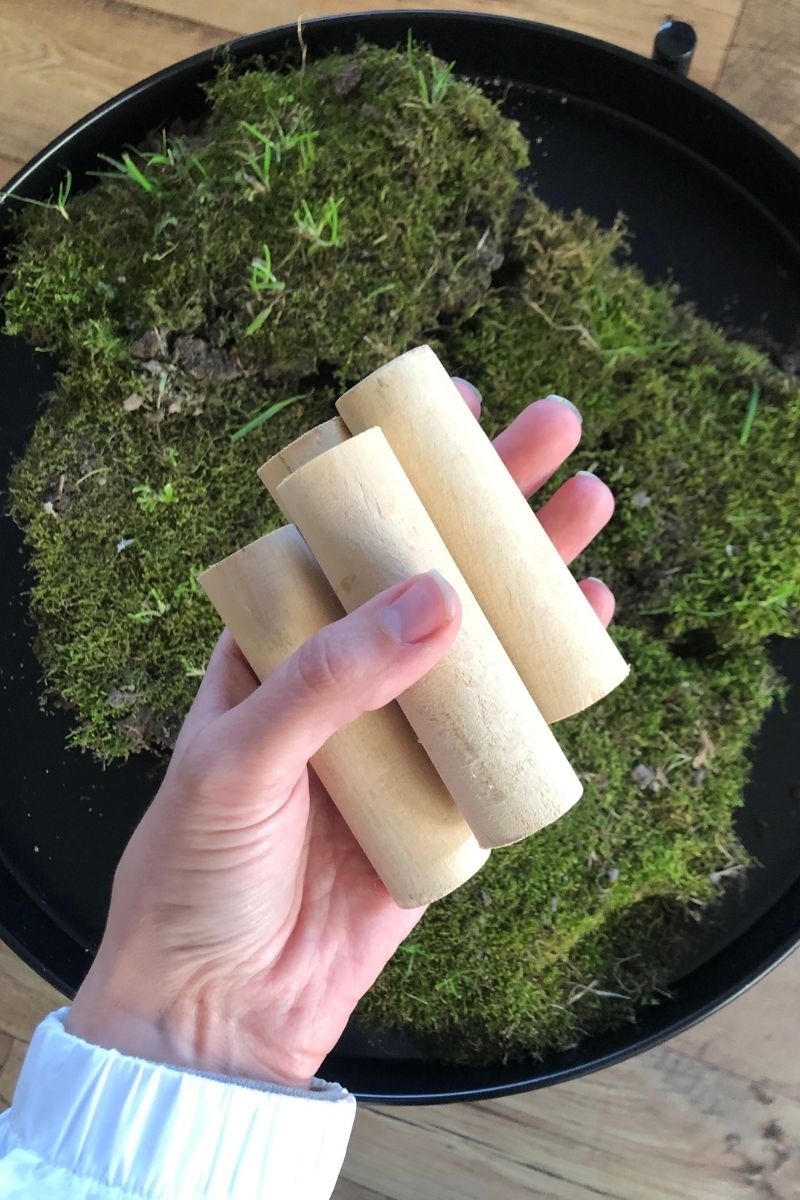
- Cut your dowel into 4 pieces of your desired length. I went with 3.5″ in length and used our miter saw.
- Double check to make sure that the pieces are level and give the edges a quick sand if necessary.
The wooden dowel pieces are what will be supporting your glass tabletop. You cannot lay the glass directly on the table because 1. it is not deep enough in this instance and 2. you will need some airflow.
If you do not have a miter saw, most hardware stores have hand saw stations set up that you can use to cut pieces down before you leave the store. It takes a bit more effort and you will need a measuring tape on hand, but you can do it without purchasing anything.
After the pieces are cut you will need to decide if you want to leave them natural like I did or stain/paint them. You will also want to consider sealing them with a polyurethane topcoat to protect them from moisture. Especially if you chose to paint them to match your table.
Step 3: Adhere the wood pegs to your terrarium table
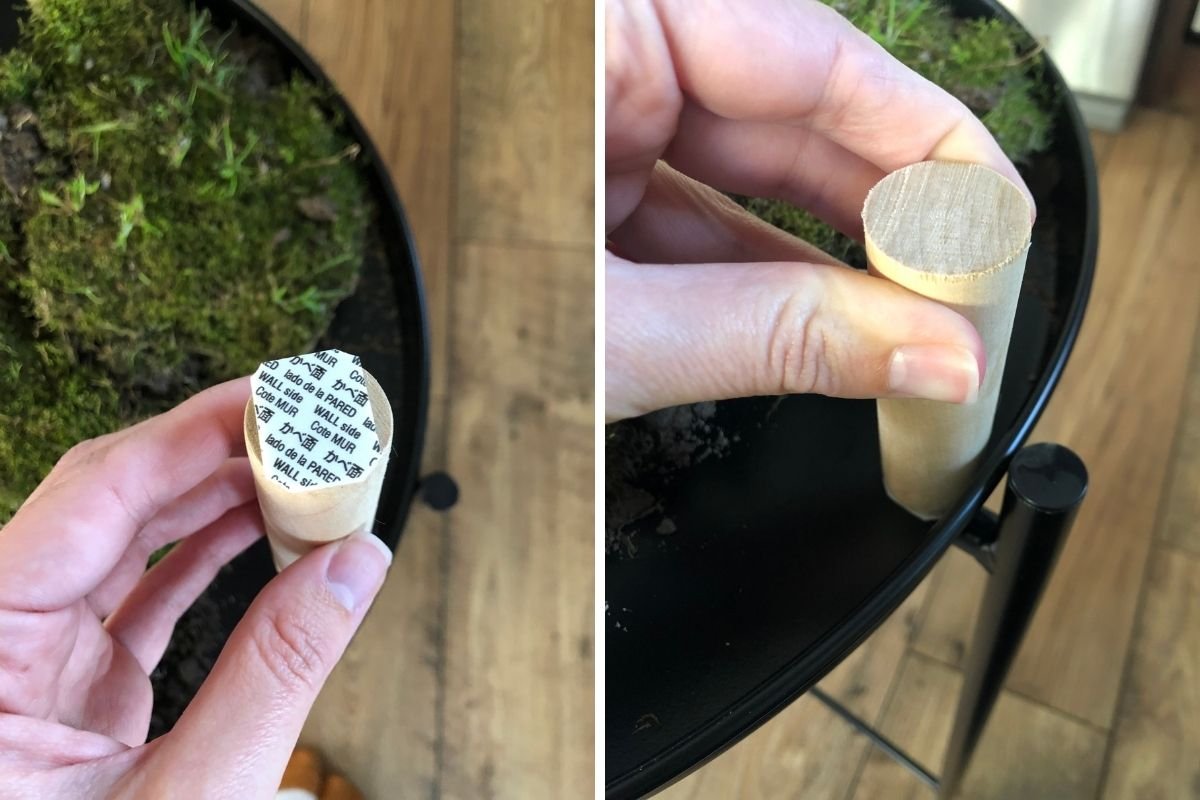
I ended up using command strips for this step. You could use a construction adhesive as well, but it will take more time to cure before you can add things to your terrarium space
- Cut the command strip down small enough to fit the bottom of the dowel.
- Stick the “object” side of the command strip firmly to the dowel
- Trim the corners so they are not sticking out.
- Peel the “wall” side sticker off and stick the dowel to the table.
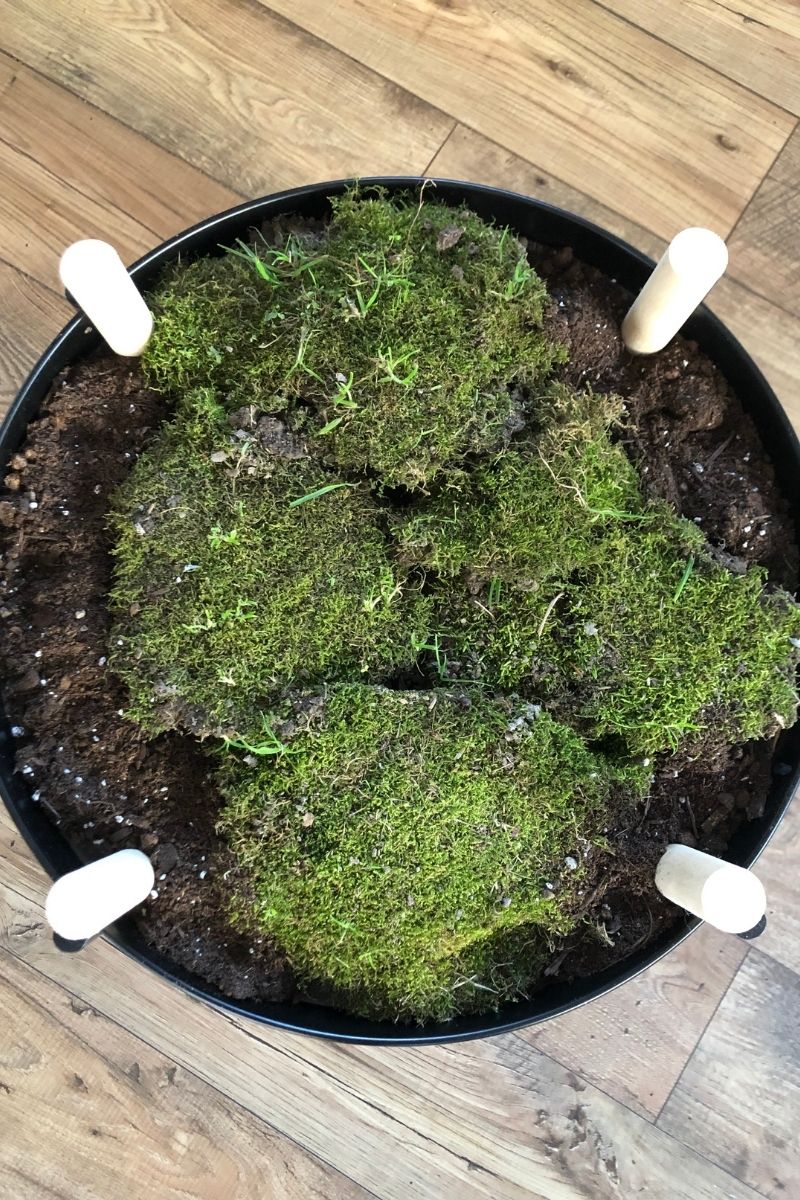
I used the legs of the table as a guide for placing the wood pieces so that they were evenly spaced.
** This is the order that you should follow for the DIY. You can see by my photo that I actually had moss on my table tray when doing this step. I got ahead of myself and used the tray when I was collecting moss from outdoors to begin the project instead of dirtying another container. It worked out, but I made sure the areas that I stuck the dowel pieces to were clean and free of any dust and dirt.**
Step 4: Add your first layer to the bottom of the terrarium
Now you are ready to add the first layer to the bottom on your terrarium coffee table.
First layer
As mentioned above, that first layer is typically rocks. Since this is such a shallow table, I am not able to layer it the same way as a deeper terrarium coffee table. I also will not be able to plant much of anything unless it grows on the very surface of soil (like moss) or has shallow roots that spread out vs down (like succulents or cacti). Air plants are also a great option for shallow terrariums.
I chose to use soil as my first layer here knowing that I would not be planting anything that needed deep soil or drainage holes.
Second layer
For this table, my second layer was my choice of live plant, moss. I collected it for free from our back yard, using a shovel to dig about an inch of soil up with the moss so I did not disturb it. I selected moss from a shady, damp area in our yard because I knew that I could recreate that type of environment inside. This table will not be getting direct sun even though it is in a sunny room. Moss is also the best choice for a live plant in this table since it grows on the surface of the soil and does not require drainage.
Third layer
My third layer was a few smaller faux plant stems that I picked up. Both are fern-like plants with lush-looking leaves. I made sure to select artificial plants that I felt looked nicer or “somewhat realistic”. Mixing them in with live moss, soil and rocks really helps to make them appear real in the finished product as well. It’s a good blend. Plus, these will not die from root rot or lack of sunlight given where my table is going.
Fourth layer
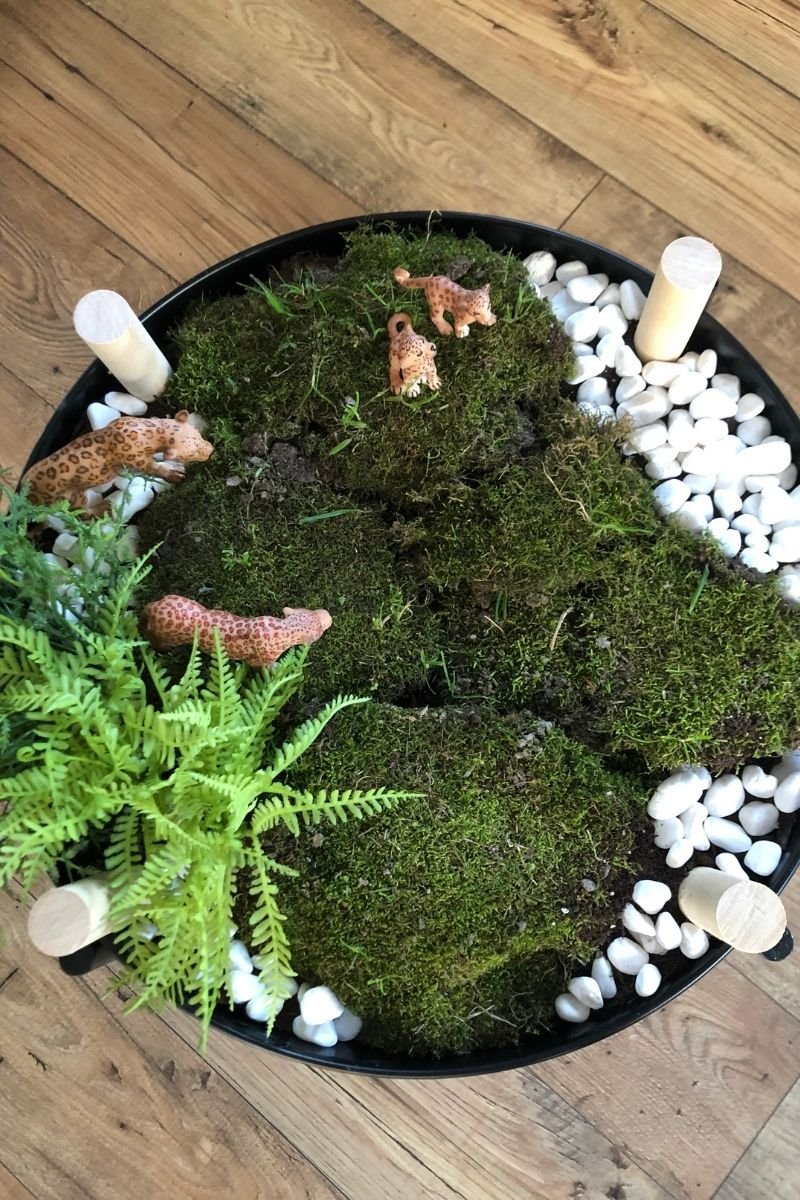
I added white rocks on top of the exposed potting soil on the sides for a decorative pop. I like the way it stands out against the black table and green plants. These are purely decorations at this point.
Fifth and final layer
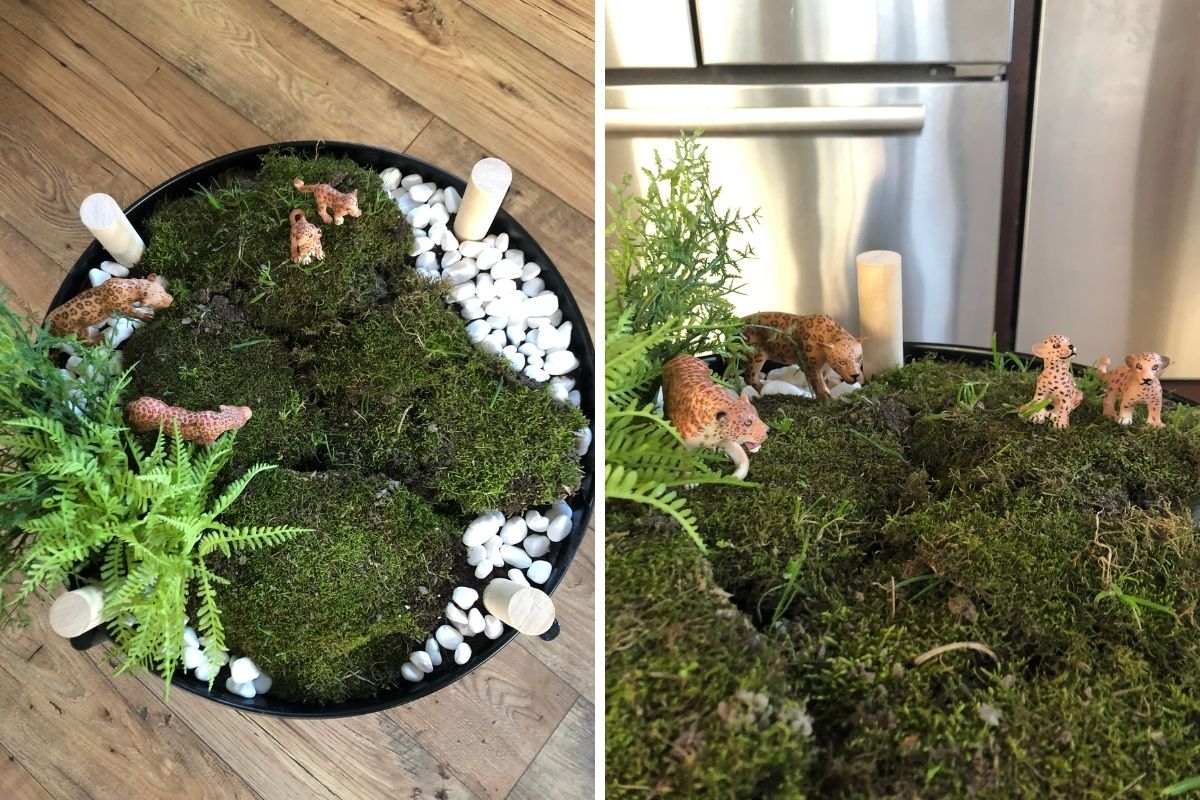
The last layer that I am adding to this terrarium table is jungle cat figures. I love fairy gardens and think it is fun to add those details to terrariums. Instead of traditional fairy garden figures, I went with the cats to match my daughter’s room. She has a moody boho vibe going on with some jungle decorations in her space already. I think the faux fern plants and the jungle cats look amazing together in her space.
You can add any figures you’d like or leave them off all together. That is what is so fun about DIY terrariums- there is so much wiggle room when creating one.
Step 6 : Mist the plants
After everything is situated, give your table a quick mist. This is the best way to go about watering moss and it also will help to keep the humidity up in your terrarium. You will likely need to mist your terrarium weekly.
Step 7 : Add the glass tabletop
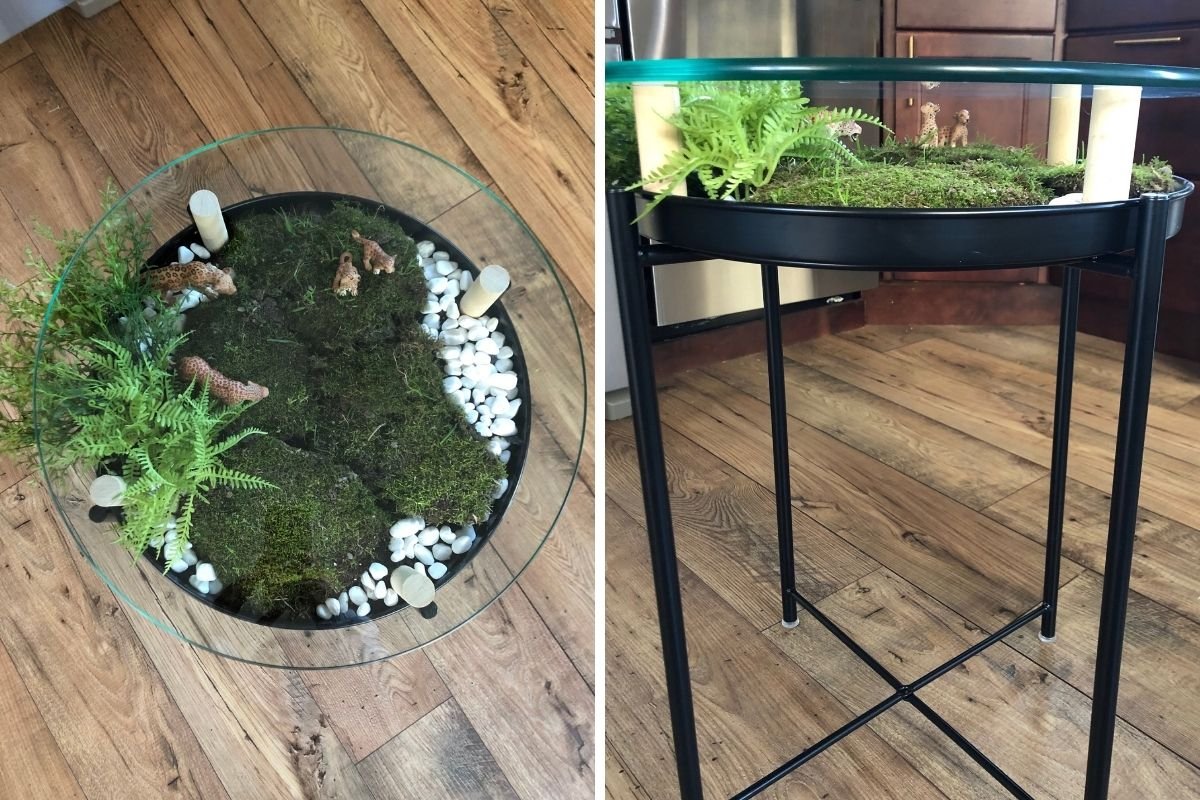
Finally you are ready to finish this DIY terrarium table by placing the glass table topper on to the side table!
Here is the glass topper that I used.
I found that the weight of the glass topper supported by the wood pieces was actually very sturdy and did not easily slide around due to the weight and the rough nature of the wood! If you are concerned or need to keep your glass from moving, you can add the clear cabinet bumper pads between the wood and the glass.
I have about 1.5″ between most of the terrarium and the topper which should be sufficient air flow, but still covered enough to keep some humidity in. This setup also gives you easy access for watering/misting since you can just remove the glass and put it back on.
Best plants to use in a coffee table terrarium
As mentioned above, it is helpful to have an understanding of plants when choosing what you will keep in your terrarium space. When setting up a terrarium of any size, you’ll want to choose the right plants for the size of your terrarium as well as its placement.
Will the plants have space to grow deep roots or enough drainage to avoid root rot? Will the table get enough sunlight to support the plants you’ve chosen? Do the plants you have chosen all thrive in similar living conditions? These are all things that should be considered when planning this DIY terrarium table.
For a succulent table
Succulents make a great choice for terrarium tables because they have shallow root systems. They also do not require a lot of attention or care. Succulents do best in an open terrarium that has ventilation. In fact, planting succulents in a closed terrarium will most likely cause them to rot. They also need to have proper drainage.
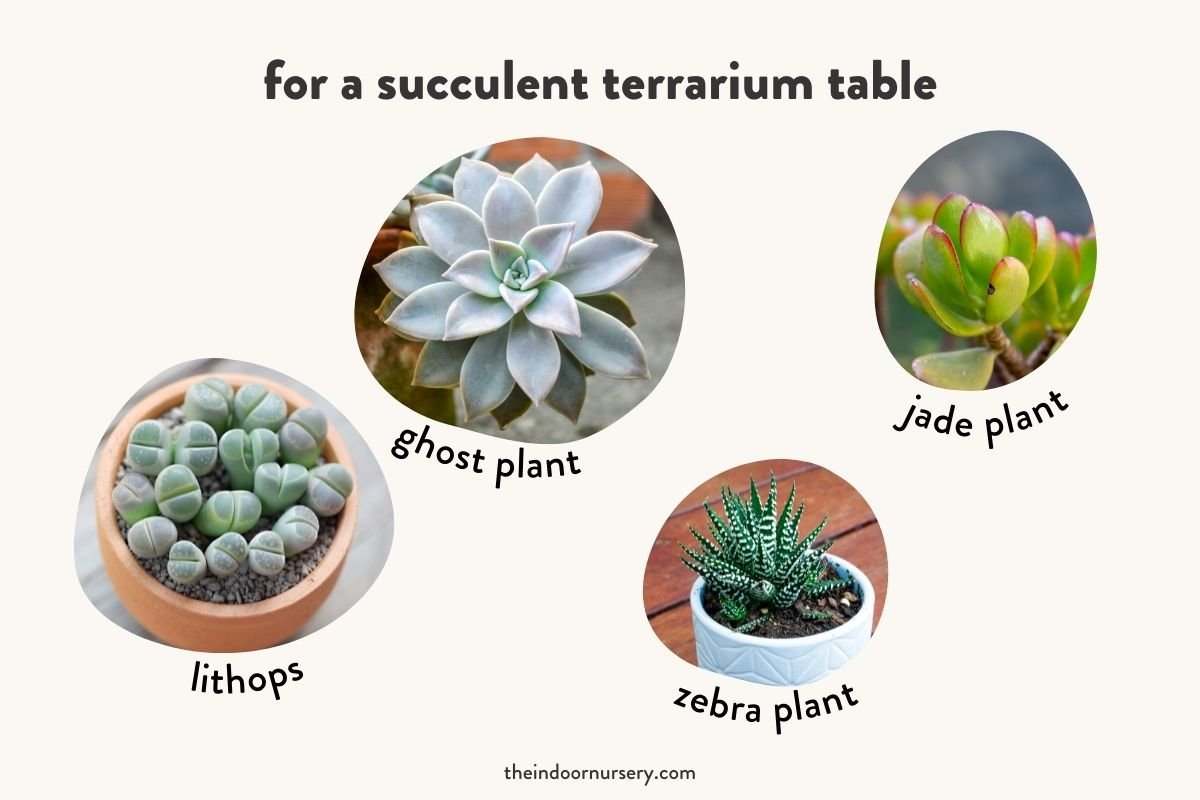
Some examples of succulents that you can use are:
- Lithops
- Graptopetalum paraguayense (Ghost Plant)
- Haworthiopsis attenuata (Zebra Plant)
- Crassula ovata (Jade Plant)
I love each of these succulents for their unique colors and foliage they would bring into a terrarium. Lithops look like little living stones!
For a desert cactus table
Cacti are also a great choice to fill your terrarium with. Like succulents, they need to have airflow and can easily rot. But they have shallow roots and do not require much attention. They are also very slow growing so they will not easily outgrow the space. You can easily intermix cacti and succulents in the same terrarium.
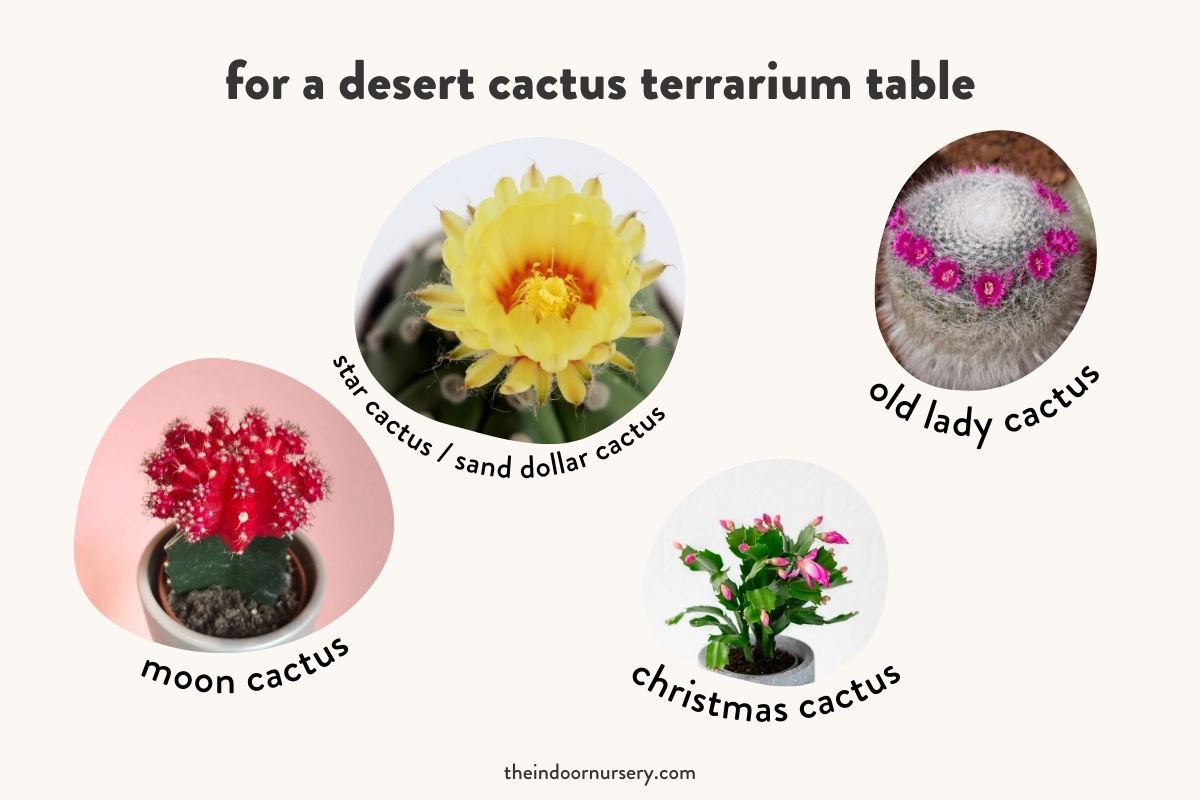
Some examples of cacti you can use are:
- Gymnocalycium mihanovichii (Moon Cactus)
- Astrophytum asterias (Star Cactus)
- Zygocactus (Christmas Cactus)
- Mammillaria hahniana (Old Lady Cactus)
These cacti are all on the shorter side so that they would easily fit into a terrarium table. You should however still pick starter plants to begin with.
For a leafy living table
For a more leafy table you will want to consider tropical plants that enjoy humidity to fill your terrarium. These plants will need a bit more space and care than terrariums featuring cacti and succulents. Since the plants can grow larger and quicker they may need to be pruned frequently as well as misted or watered more often. I would not recommend mixing desert cacti/succulents in with these kinds of plants.
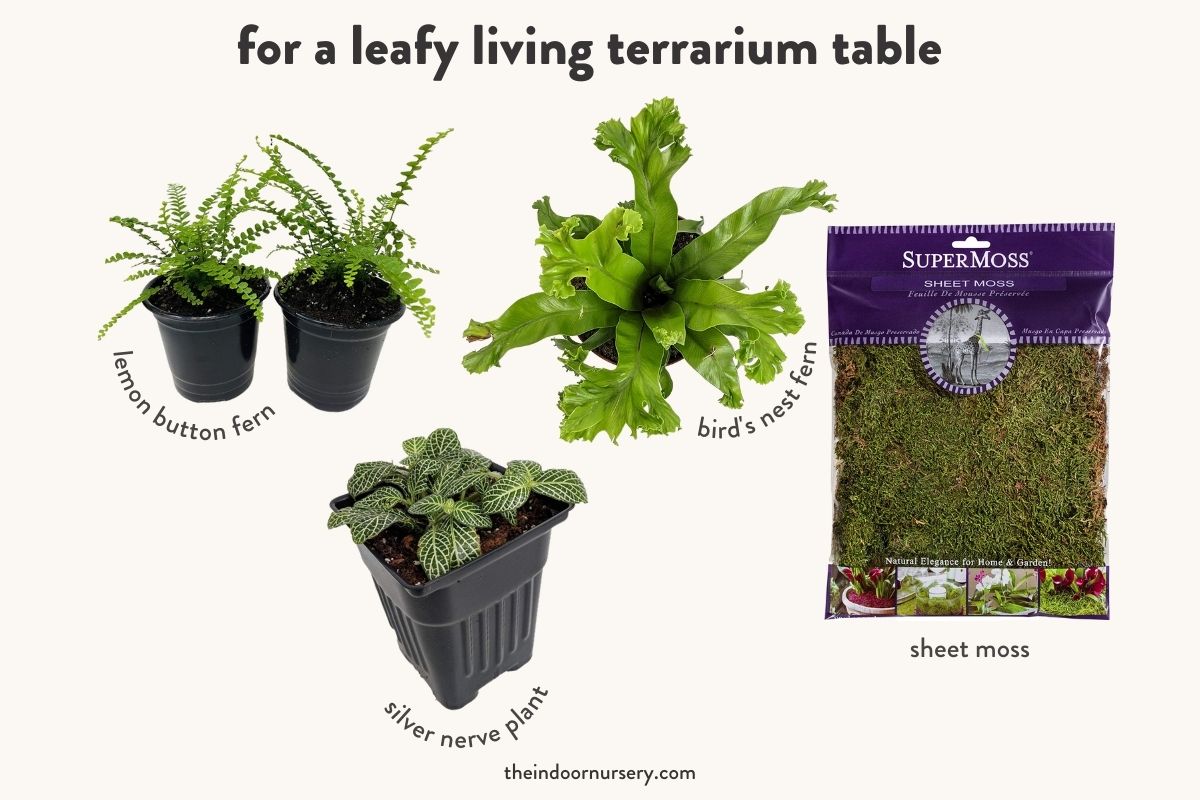
Some example of leafy plants you can use are:
- Bryophyta (Mosses)
- Fittonia albivenis (Nerve Plants)
- Asplenium nidus (Bird’s Nest Fern)
- Nephrolepis cordifolia (Lemon Button Fern)
These plants are all rich and beautiful shades of green with interesting foliage. I love the pop of color on the nerve plant’s leaves. They would fill out a terrarium table nicely.
Do you love terrariums too?! Let us know if you plan to create your own terrarium table in the comments below!
More How To Guides
- How To Get Rid Of Scale On Plants
- DIY Terrarium Table: How To Make A Table With Plants Inside
- How to Use Leca for Plants: Step-by-Step Guide with Pictures
- How To Use Grow Lights For Indoor Plants
- How To Propagate Peperomia Plants 2 Ways
- DIY Propagation Box With Grow Light
- How To Make Pothos Fuller (In 5 Minutes)
- How to Make a Moss Pole for Your Climbing Plants
- How to Make Potting Soil for Indoor Plants, Plus My Secret Ingredient
- How to Propagate a Split-Leaf Philodendron: Easy Step-by-Step Guide

Marquis *wants* to know how to keep happy and healthy plants, but had a hard time finding information that wasn't written by just another copywriter. After nearly losing one too many plants, it was time to take matters into her own hands. A team of plant scientists and nursery hands was brought together and The Indoor Nursery was born.