Once you get into indoor plants there are so many ways to display and care for your plant babies. One of the coolest ways is to use a closed container and make a beautiful terrarium. It is a cute way to make an indoor garden made of moss, small plants, or even a fairy garden.
It is quite easy to make a DIY terrarium. All you need is a glass container, pebbles, potting mix soil or other substrates, a plant, and some time to get creative! If you’re new to terrariums, read some expert advice on setting up your terrarium before jumping into this DIY.
what is a terrarium and how does it work?
A terrarium is an indoor garden that is usually in a sealed container. It is a decorative way to display plants and keep a miniature garden!
Because it is in a sealed container, it is a mini-ecosystem. The water is recycled in the sealed terrarium and the high humidity helps keep the plants healthy. One of the best features of a closed terrarium is that you do not have to guess if you have to water the plant or not. It is also a great way to grow propagations since it has high humidity in the vessel.
A terrarium is usually in glass containers with a cover but it can also be an open terrarium. Well, a semi-open container with high walls so that air can freely flow through it. Open terrariums are better suited for air plants that do not need as much moisture. A succulent terrarium is also a type of open terrarium.
Terrarium tables have been growing in popularity and you can easily make a terrarium table yourself.
PRO TIP: These make great gifts for plant lovers 😉
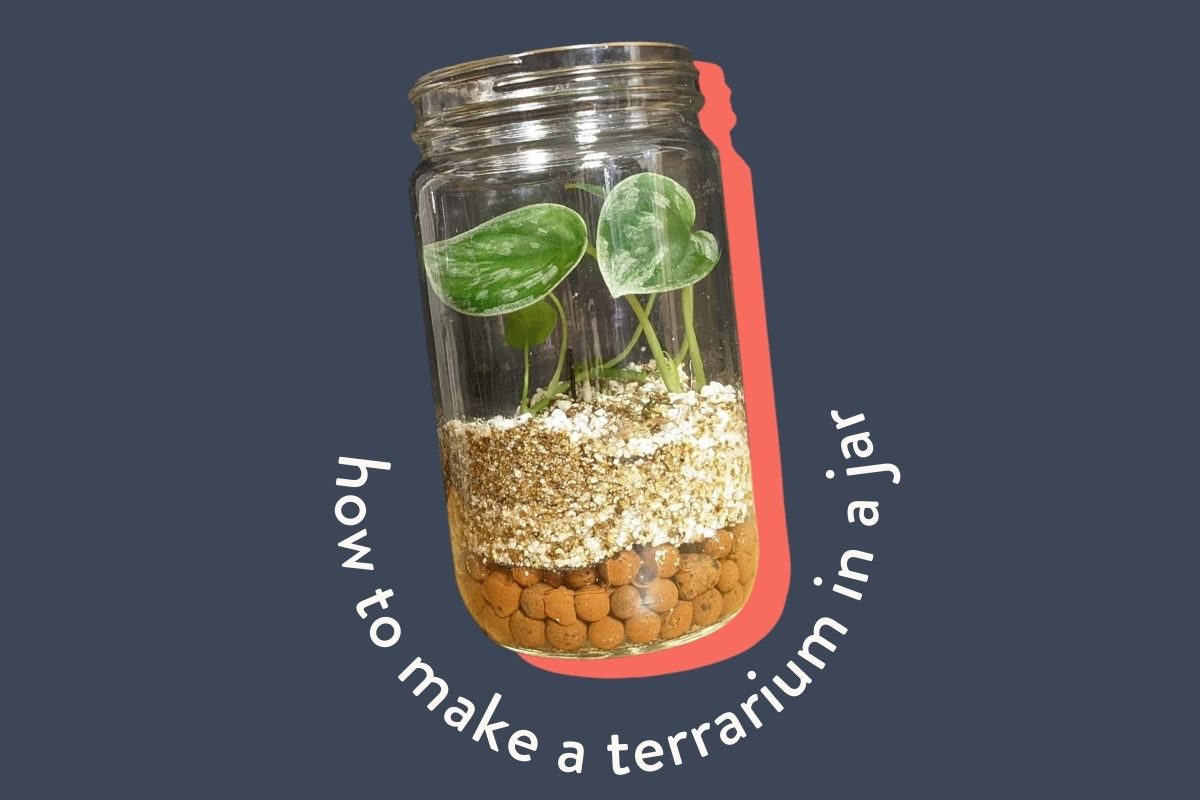
how to make a terrarium in a jar, step by step
What you’ll need:
- Clean jar with a lid
- Plastic window screen, cut to fit the jar
- Leca stones (pebbles or rocks)
- Perlite or preferred substrate
- Small plant or cutting

step 1: gather your materials and prepare the plant
The first thing you need to do is prepare the plant you will be using for the terrarium. Nothing much has to be done for a cutting. For small plants that are in soil or any kind of substrate, make sure to clean the roots as much as possible.
Make sure the plant is small enough for the jar that you are using. There should be room for the plant to grow and stay in the terrarium for a couple of months.
Choose a terrarium container that is big enough for the plant and will have room for the plant to grow. You can even make a mason jar terrarium and choose small terrarium plants for your mini garden. For this project, I recycled an old kimchi jar.

step 2: add the layer of leca to the jar
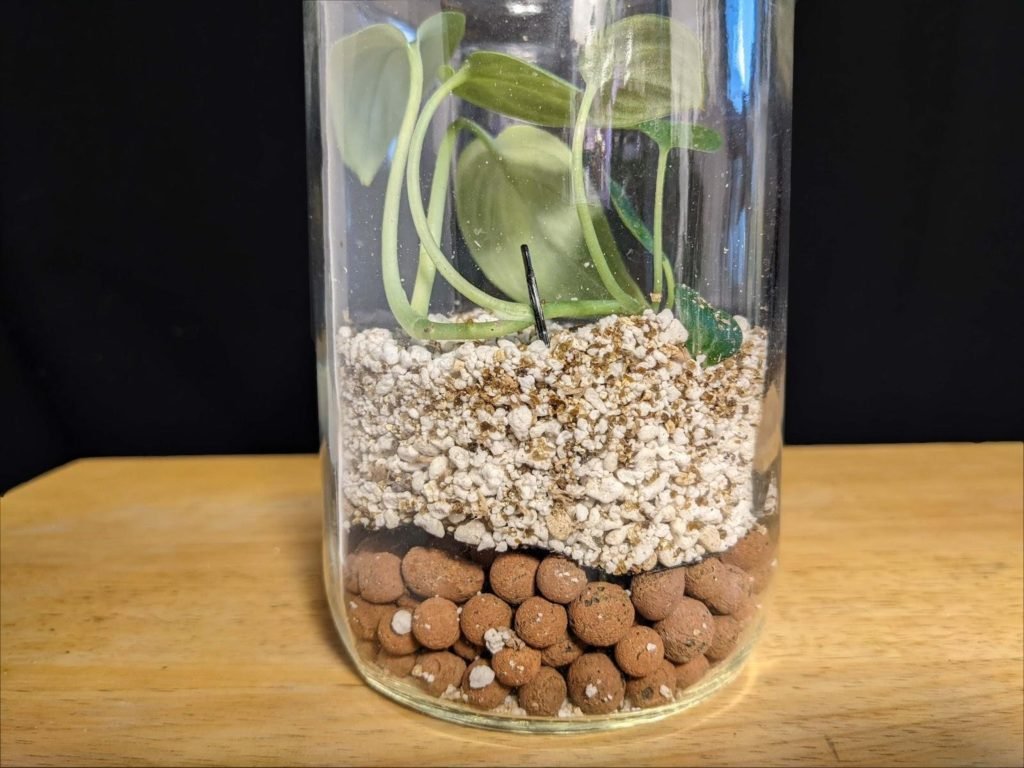
Leca is another kind of substrate and will help with humidity and evaporation. The leca (or stone) layer will act as the drainage layer and it should be about a quarter of the jar. For this jar, it is about a two-inch-thick layer of leca. The water added to the jar will fill in this layer and will be a visual cue to how much water should be in the terrarium.
For more tips on how much water to add and how to fertilize, read through our post about how to use leca.

step 3: add the window screen
The window screen will keep the substrate layer separate from the leca layer. Some people do not use screens but it just keeps things neat! It will also help with keeping the roots from touching the water, which will help avoid root rot.
Eventually, the roots will grow into the leca layer, and that will be OK, root rot shouldn’t be an issue then.

step 4: add the substrate and plant
There are many kinds of substrates that can be used for a terrarium—potting soil, potting compost, pon, perlite, etc. For this terrarium, the cutting that I am using was rooted using the “boba method”—leca on the bottom, then perlite and vermiculite, then sphagnum moss and then I covered the top with plastic. It kind of works like a terrarium except that the setup was not sealed in a jar. So, I chose to use perlite and vermiculite as the substrate for this terrarium.

Add a layer of substrate, about an inch, just enough to make sure that the roots aren’t directly touching the leca. Place the plant into the jar and hold it into the place. Then add more substrate around it until it holds the plant in place. I like to use a hairpin to help keep the plant in place, eventually, the roots will grow and the hairpin can be removed.

step 5: add water
It is important to remember that the roots cannot touch the water when the plant is added to the terrarium. Luckily, it is easy to see how much water should be in the terrarium because of the distinct layers in it. So, water should only be in the leca layer. Just remember to keep it in the leca layer if ever you need to add water later on.
step 6: seal the jar
If the jar you are using doesn’t have a glass jar you can use plastic wrap or a sandwich bag held in place with a rubber band. As long as the jar is sealed and the water will not evaporate. Where you place the terrarium depends on the plant.
Place the terrarium jar on a window sill with direct sunlight if your plant needs that kind of light. Check-in on it to see if the leaves aren’t burned. Some plants need indirect sunlight, so make sure to check what type of light the plant requires.
Tips for terrariums
- Choose a plant that likes high humidity like ferns, pothos, philodendrons, and Syngoniums
- The plant should be small so that it can grow into the jar
- Cuttings can be used too, it will be cool seeing the plant and roots grow
- Fertilize once a month if the plants are growing
- Open the jar once a week for a couple of minutes to let it breathe
- Keep an eye on the water level, it shouldn’t dry out
More How To Guides
- How To Get Rid Of Scale On Plants
- DIY Terrarium Table: How To Make A Table With Plants Inside
- How to Use Leca for Plants: Step-by-Step Guide with Pictures
- How To Use Grow Lights For Indoor Plants
- How To Propagate Peperomia Plants 2 Ways
- DIY Propagation Box With Grow Light
- How To Make Pothos Fuller (In 5 Minutes)
- How to Make a Moss Pole for Your Climbing Plants
- How to Make Potting Soil for Indoor Plants, Plus My Secret Ingredient
- How to Propagate a Split-Leaf Philodendron: Easy Step-by-Step Guide

Marquis *wants* to know how to keep happy and healthy plants, but had a hard time finding information that wasn't written by just another copywriter. After nearly losing one too many plants, it was time to take matters into her own hands. A team of plant scientists and nursery hands was brought together and The Indoor Nursery was born.