Key takeaways:
- Composting is a process that recycles organic material, such as yard waste and food scraps, into fertilizer.
- Backyard composting consists of brown material, green material, air, and water added to a compost heap to create usable compost for plants.
- Types of composting include hot composting, which involves regularly mixing and heating the compost pile to 140°F, and cold composting, which is a passive method that takes longer for the organic matter to decompose.
- Indoor composting options include using a Bokashi-type system or worm composting.
- It is important to consider the pH level of the finished compost and test it before using it on plants to prevent burning them.
If you are concerned about lessening your household waste and want to take better care of your indoor plants, why not try composting?
Even if you are an apartment dweller and do not have a lot of space, it is still possible to make your own compost.
What is composting?
The composting process recycles organic material, like yard waste and food scraps, into fertilizer. Most composting is done outdoors but it can also be done indoors for people who do not have backyard space.
What is backyard composting?
Backyard composting is composed of three things – brown material, green material, air, and water – that are added to a compost heap and eventually create usable compost that can be added to plants as fertilizer.
- Brown material (aka brown waste) can be dried leaves, fallen branches, cardboard, and shredded newspaper.
- Green material (aka green waste) is a mixture of grass clippings, yard trimmings, and kitchen waste.
It may surprise you that there are many different kinds of composting. We’ll briefly cover hot and cold composting for outdoor spaces and then get into our interview with Nikita Le, who teaches people how to compost in Trinidad and Tobago, about how to get into indoor composting.
What are the types of composting?
Hot composting
Hot composting is a bit more labor-intensive since the pile in the compost bin has to be mixed regularly and reach 140°F. The organic material has to be layered with brown material on the bottom, then soil, and green material. There should be two to three times more brown material than green material, it should be a bit wet (like a sponge), and air should flow through it. The right combination of organic waste, water, and air will encourage microbes to break down the mixture into finished compost.
The compost pile starts “cooking” and heats up to 140°F. Once it starts to cool down, the pile has to be turned and the materials moved from the center outward. To have usable compost within a month, the pile has to be turned every other day. If it is done weekly, the finished compost will be ready in two to three months.
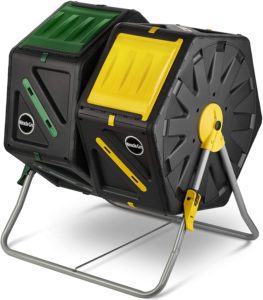
A compost tumbler is a useful tool for those that have limited space. It makes hot composting easier since the tumbler is easy to spin and mix the organic waste. It keeps the temperature just right, keeps pests and animals out, and prevents composting odors. The main drawback is that these are quite large and won’t fit easily indoors without consideration.
Cold composting
Cold composting is a way of passive composting where the organic matter is left alone in the outdoor compost bin. It also takes a lot longer, it takes a year or so for the compost material to decompose into nutrient-rich fertilizer.
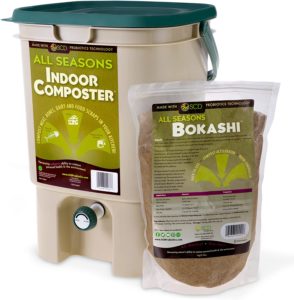
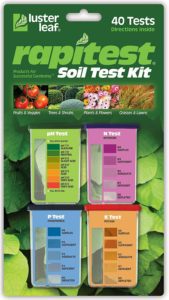
This method can most easily be done indoors with a Bokashi-type composting system. They are compact and relatively convenient. Though the manufacturers say that you can dump the compost directly onto your soil with your plants, I’d recommend throwing it into a separate container with soil to chill out for a bit. In my experience, the material I got after following the manufacturer’s instructions was too green and harsh to add directly to potted plants. It would go well into a worm compost, or directly into the ground. You can always use a pH kit to test your compost or soil mixture to ensure that you aren’t burning your plants with your fresh compost.
Vermicomposting
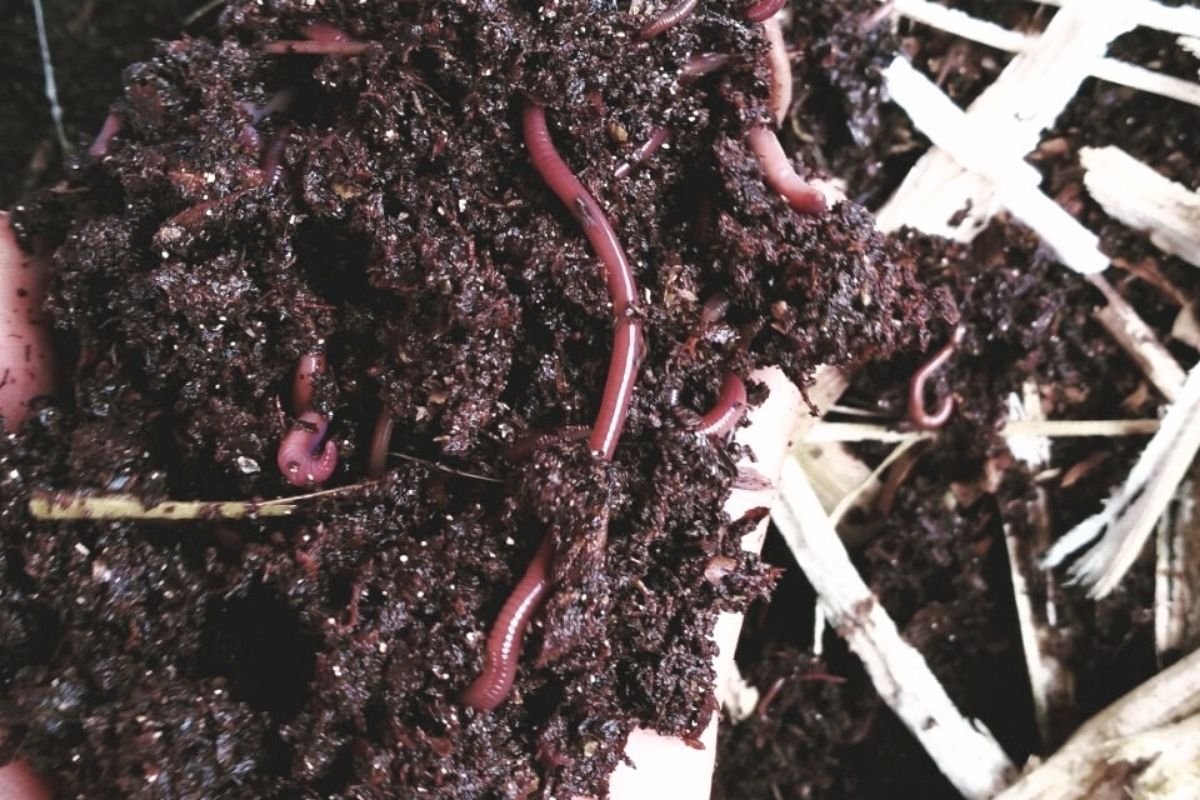
Another type of composting enlists the help of red garden worms to process kitchen scraps and cardboard into “worm castings” aka worm poop. We find that this is the best option for house plant enthusiasts since it can be done indoors and the worm bin has a small footprint.
We asked Nikita Le, who has tried all kinds of composting to make fertilizer for her veggie garden, for her tips on using worms for composting.
She first got into composting to avoid chemical fertilizer and as a way to minimize landfill waste since there isn’t a good recycling program in her area. And then she expanded her hobby by holding workshops to help her community start composting. Once the COVID pandemic hit, she launched her blog to still reach people and help them with their home gardening.
How did you get into worm composting?
Composting is a little addictive for me! I tried all kinds but found that worm composting produces a better fertilizer for my vegetable garden and houseplants.
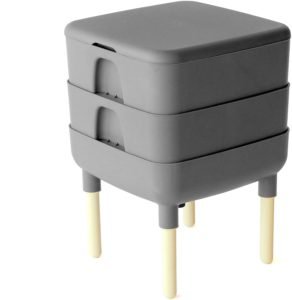
What do you need to start vermicomposting with earthworms?
Aside from the worms, a multi-level bin or composter is something people should use. They can either buy a ready-made one or DIY it with a plastic bin.
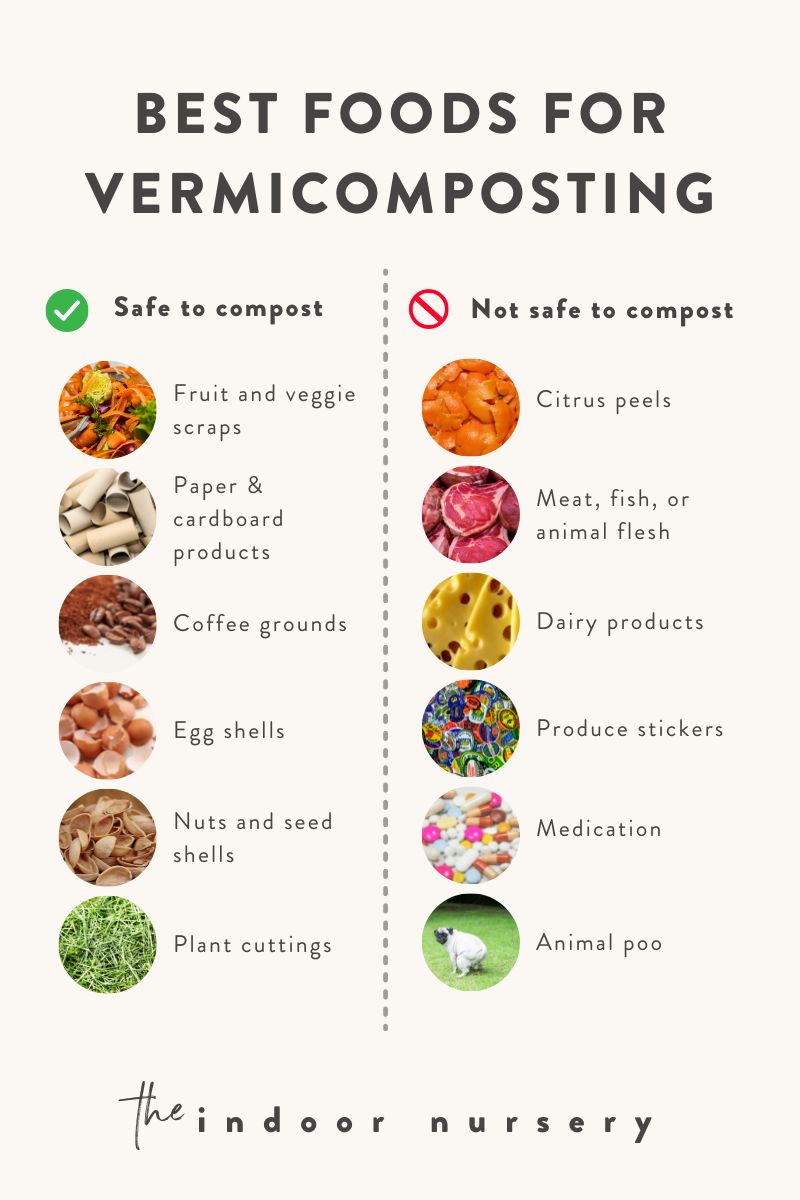
Then they have to lay a bedding of cardboard or shredded paper, anything carbon-rich, to cover the bottom of the plastic bin. The worms will eat that along with uncooked vegetable scraps. (I fed my worms excess kombucha scoby and they loved it!)
Once they are done with one layer of the bin the worms will move into the next layer.
How much food can be added?

This is important to note! The amount of vegetable scraps should be the same weight as the worms or less. So, if you have a pound of worms you can add a pound of food. Cover it with bedding so that the food will not attract fruit flies. The worms have to consume all the food before you add more food.
The worms are going to eat the food waste and the bedding. What will be left behind is the worm casting. It is high in microbes and really good for garden soil and plants.
Which food is bad for the worms?
The worms are sensitive. They breathe through their skin so they need the environment to stay moist and you cannot add anything that has a strong scent or is very spicy.
You don’t want to add a whole bunch of onions or citrus. If you have a little bit it’s not going to be a huge deal but you don’t want to overload your bin with that kind of stuff.
⛔ No meat, no dairy, no cooked food, you can only add vegetable scraps and peels.
⛔ No whole eggshells – you have to wash it, bake it, and put it through a coffee grinder. The calcium in the eggshells helps regulate the pH of the worm bin.
You don’t want the material in there longer than a week. So, if you find the material in there longer than a week then you need to add less.
One of the things when I first started was to kill my worms in so many ways, so many times. It was really horrible. When you are just starting it is really easy for somebody to overfeed their worms. Because you’re excited and always checking and all but the truth is, the worms do really well with near-neglect.
One of the things to do is feed less rather than more! You can check in on day two or three to see if they are eating the food and looking healthy. Check on them but don’t bother them.
What about the bin, how should it be maintained?
Try to keep the bin moist but not wet. Remember to drain any liquid that accumulates on the bottom bin regularly, you don’t want the liquid to build. And the bin should be placed in a dark spot, the worms don’t like a light!
I find composting to be fun once you get the hang of it. It’s one of those things that once you start, you get into it and really enjoy the process. I hope our readers are inspired and encouraged to start worm composting!
more about composting
- 10 Best Worm Composter Bins For Easy Homemade Compost
- Compost Starter 101: When You Need It And How To Make It
- How to make a DIY indoor worm composting bin in 4 steps
- What to do with extra scoby (hint: it’s good for the soil)
- Vermicomposting for beginners: how to compost indoors for happy plants
- How to use worm castings for happy plants
- How to make worm casting tea in 4 easy steps
- Here’s how to harvest worm castings
- how to use compost accelerator for faster composting
- how long does compost take to turn into nutritious soil? it depends

Marquis *wants* to know how to keep happy and healthy plants, but had a hard time finding information that wasn't written by just another copywriter. After nearly losing one too many plants, it was time to take matters into her own hands. A team of plant scientists and nursery hands was brought together and The Indoor Nursery was born.