key takeaways
- Marijuana pruning can increase yield significantly.
- Trimming is sometimes referred to as manicuring.
- Good trimming technique creates greater potency, reduces mold formation, and improves the overall smoking experience.
Although we all enjoy the look of skillfully trimmed cannabis flowers, marijuana trimming isn’t all about aesthetics.
Far from it.
What most of us really care about is the smoking experience and the high.
And that’s exactly what well-manicured buds provide.
So all the effort you’ve put into growing isn’t wasted, we cover everything you need to know about pruning and trimming marijuana plants.
Marijuana pruning techniques
You need to prune cannabis plants at every growth stage to achieve the most productive crop. In fact, there are specific techniques for each growing stage, and with a little practice, you’ll know exactly when and what to prune away.
Marijuana trimming more commonly refers to the harvesting process, which I’ll go through in depth later in this post.
- Pruning
- Foliage thinning
- Topping
- Lollipopping
- Trimming for harvest
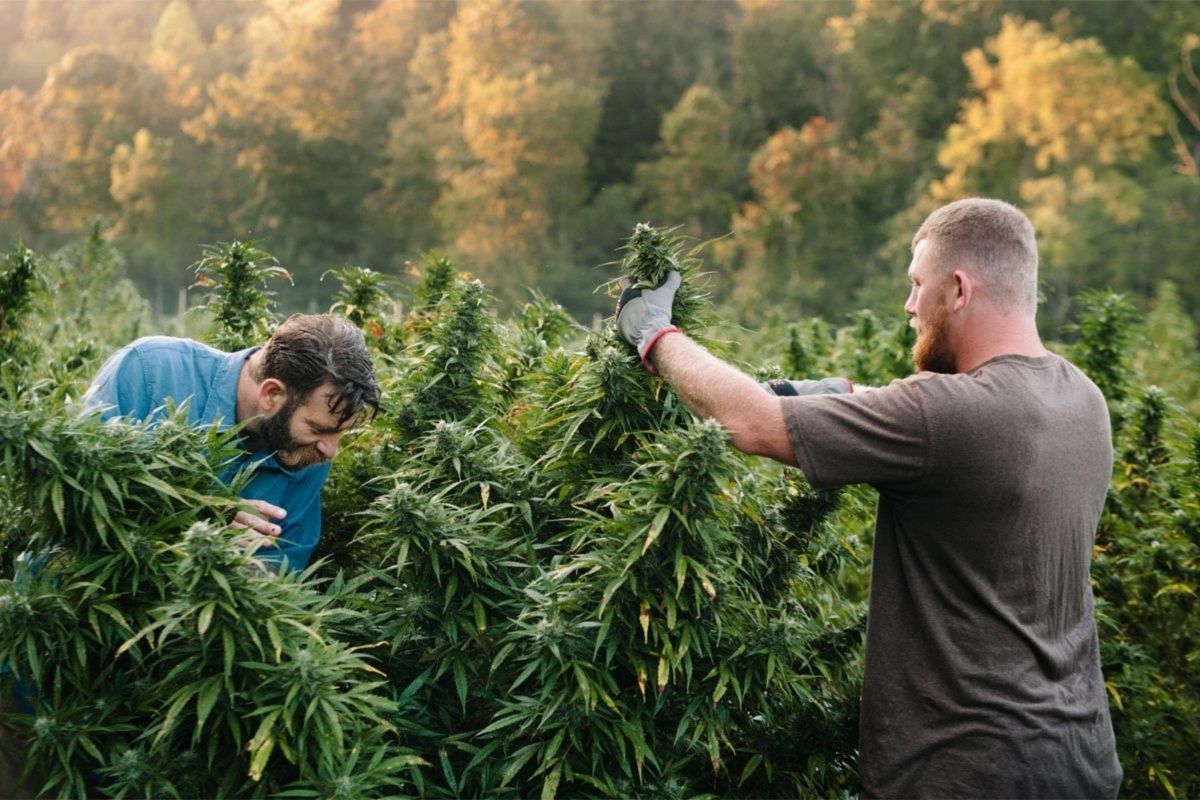
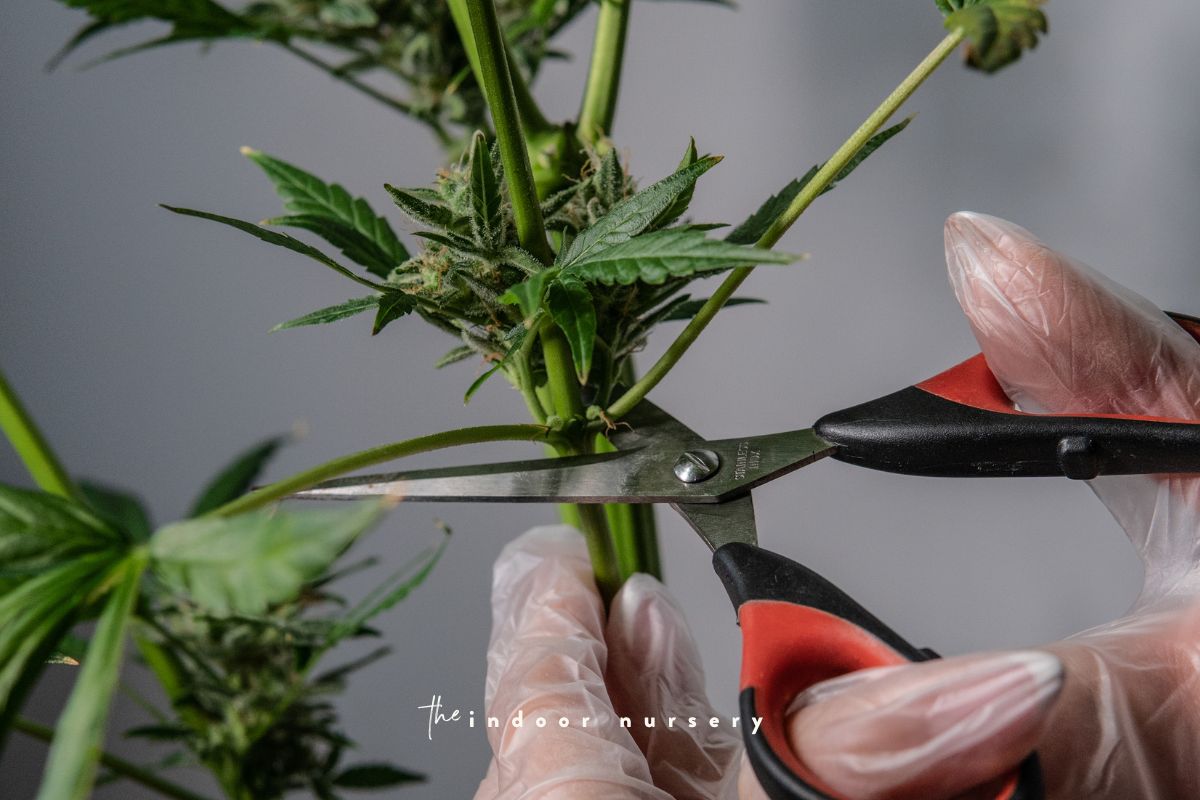
Whether trimming or pruning, only use clean, sharp scissors to protect your plants from disease and tissue damage from blunt cuts.
Why prune a marijuana plant while it’s growing?
Pruning marijuana seems counterintuitive at first. Why waste any part of your harvest? The answer is that when left to grow un-pruned, marijuana plants will only grow a few buds. As marijuana plants grow, they shoot up and fill themselves in with lots of leaves.
The plant will grow like a Christmas tree if left untrimmed with a thick wide base and a tapered top, crowned with a single large cola of flower buds at the very top, and some small flower buds along the sides. This isn’t the ideal shape for a productive plant, which is why pruning and shaping is an important part of growing marijuana.
Thinning out foliage on a marijuana plant
Pruning a cannabis plant helps it grow in multiple ways.
First, by removing bulky inner leaves, you’ll increase airflow to the innermost layers of foliage.
Second, this technique delivers more light energy to the remaining foliage and prevents moisture build up. More light and less moisture prevents mold, mildew, and pests from flourishing in the dark and damp conditions.
Lastly, removing internal leaves will encourage root growth and healthy branching as your plant redirects energy to its outermost growth.
As your marijuana plant’s leaves grow larger, you’ll also need to remove some outer leaves from time to time to prevent them from shading the rest of the plant. It’s important not to remove too many of these, however, since they perform life-giving photosynthesis for the plant. With practice, you’ll refine your trimming technique to provide the perfect balance of airiness and robust foliage.
Along with regular thinning, you’ll also want to deadhead your plant as it grows. Deadheading is the process of removing leaves that naturally die off as the plant grows (this is a totally normal process).
As long as the rest of your plant is healthy, then clipping this dead plant matter will help the marijuana plant avoid disease and spend energy where it’s most valuable to you: on healthy leaves and buds.
A good rule of thumb whenever trimming or pruning is never to remove more than a third of your plant’s foliage at once to make sure it can continue capturing energy to maintain its tissues. After any type of trim, give the plant time to heal before picking up the shears again.
When the leaves get enough light and air, they help the plant grow strong, and strong branches will better be able to support the flower buds that will eventually grow for you to harvest. This is one of the reasons that many growers will start trimming their plants as early as the seedling stage.
By training and shaping them early on, you can grow marijuana plants with a higher yield than un-trimmed plants would provide when they reach flowering maturity.
This is an epic video that teaches you how to trim for bigger buds:
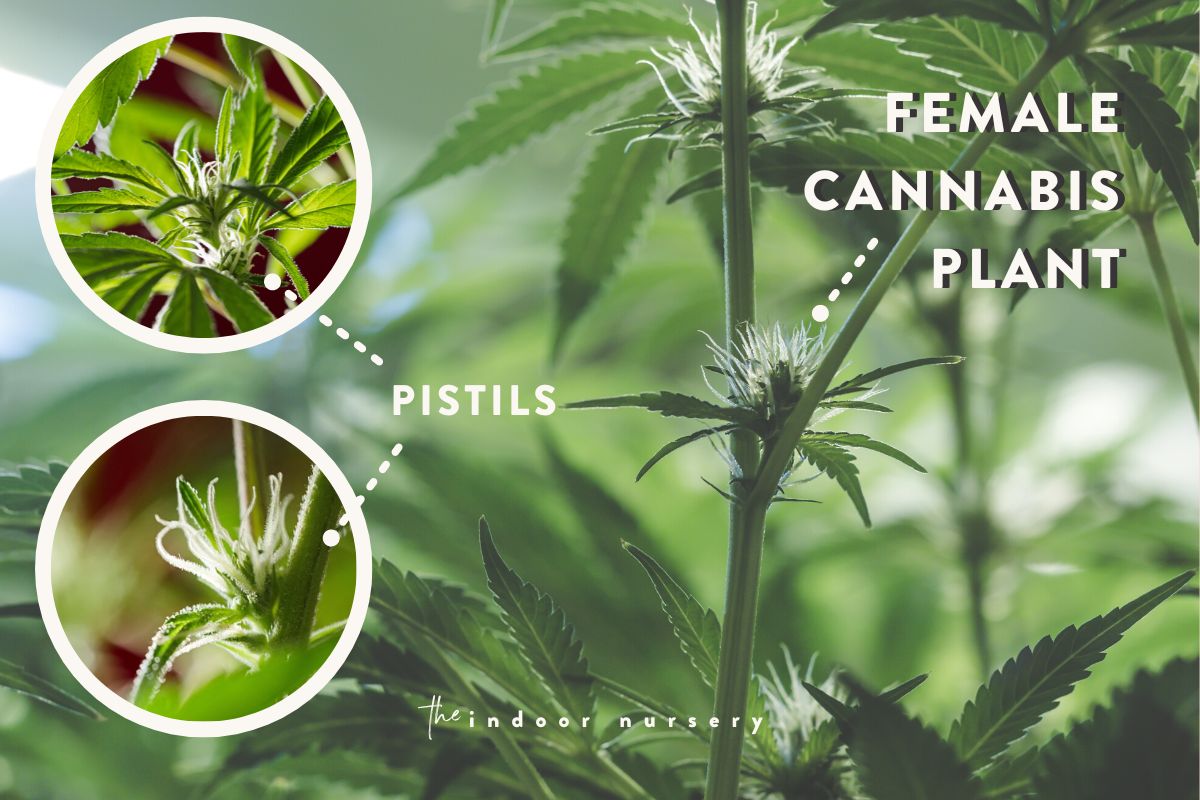
Side note: identifying the gender of your marijuana plants
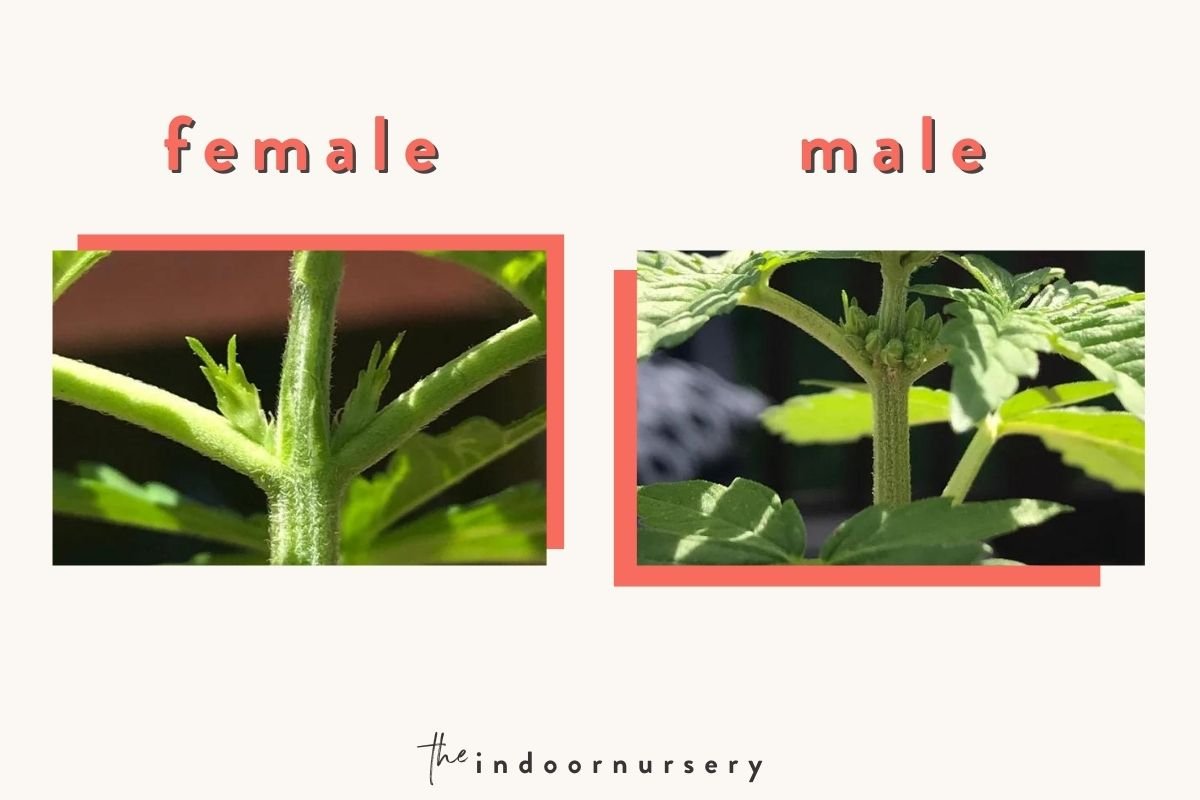
Pruning is a great opportunity to inspect the plant for its gender.
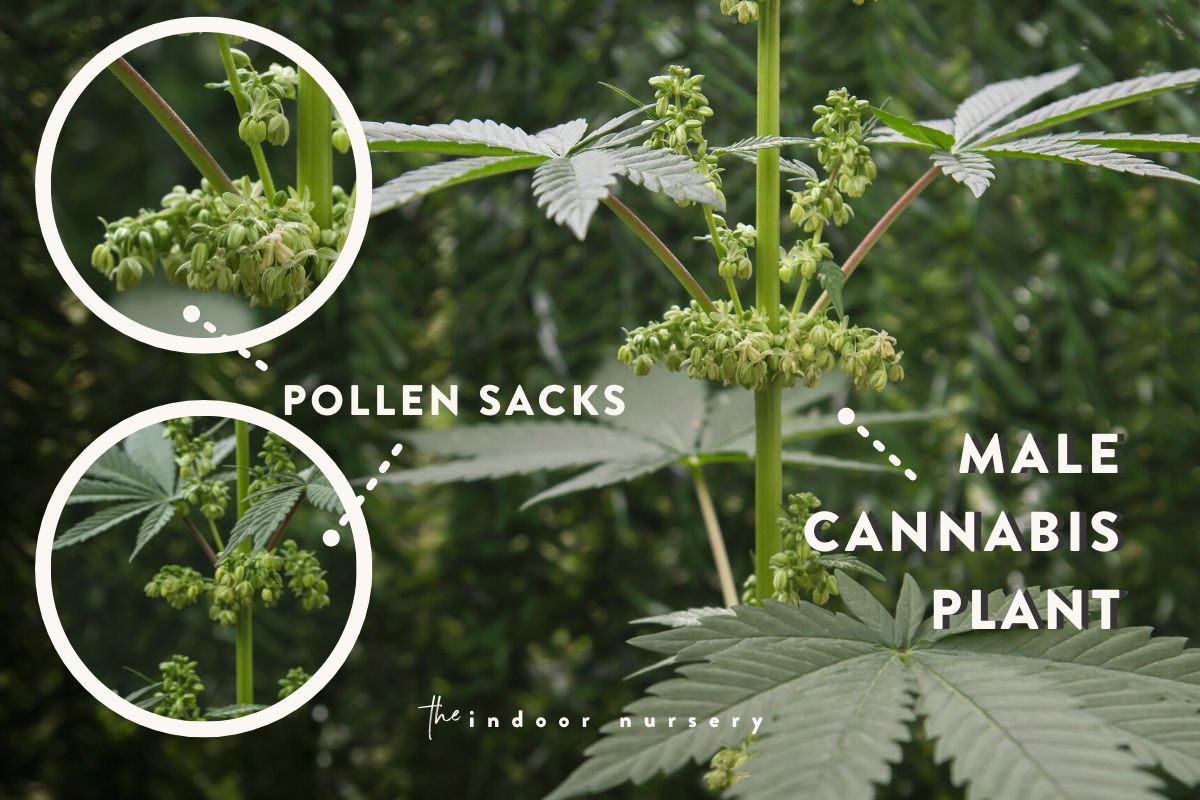
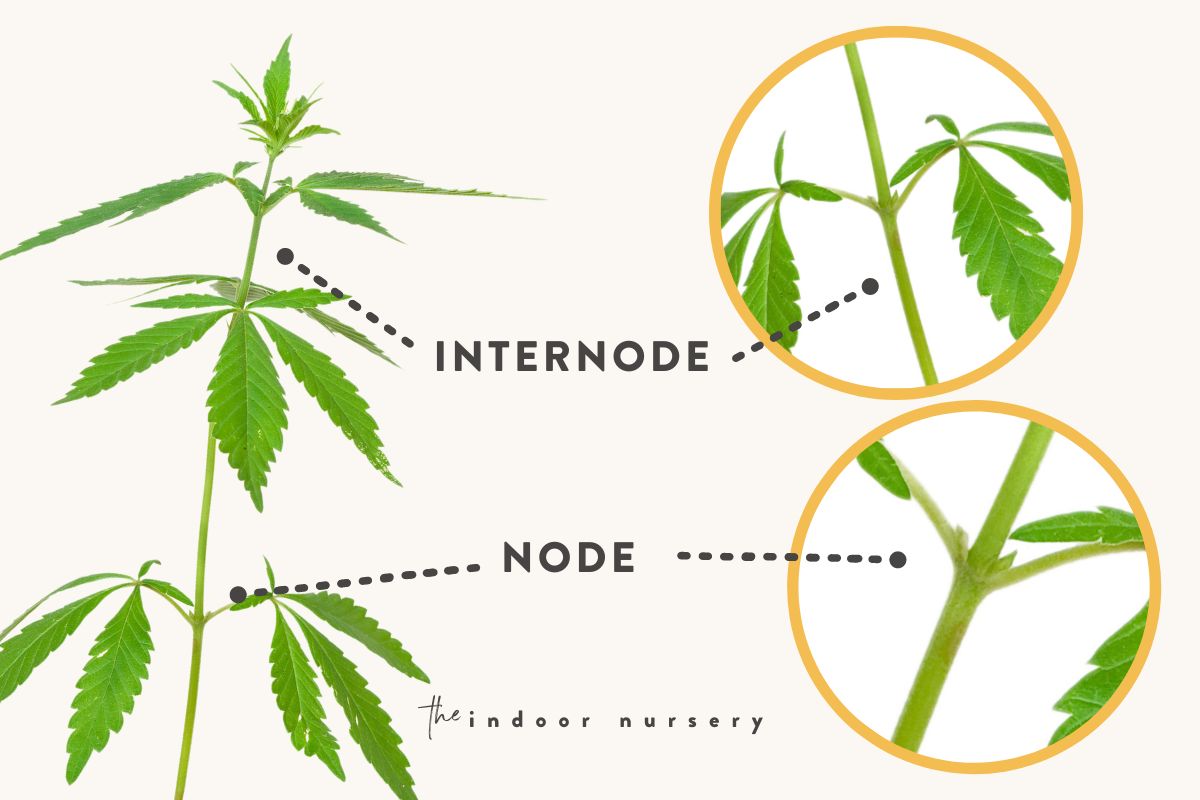
- Male plants have stamens on their stem nodes, which are small sacs filled with pollen.
- Female plants have pistils at these nodes, and whether they’re pollinated or not, they will grow flowers. If pollinated, they’ll be full of seeds (not good for harvesting).
If you catch and remove male marijuana plants from your crop early on, you can prevent them from pollinating the female plants, and they will produce seedless, usable marijuana buds. Identifying the gender will also determine how you prune the plant.
Topping a marijuana plant
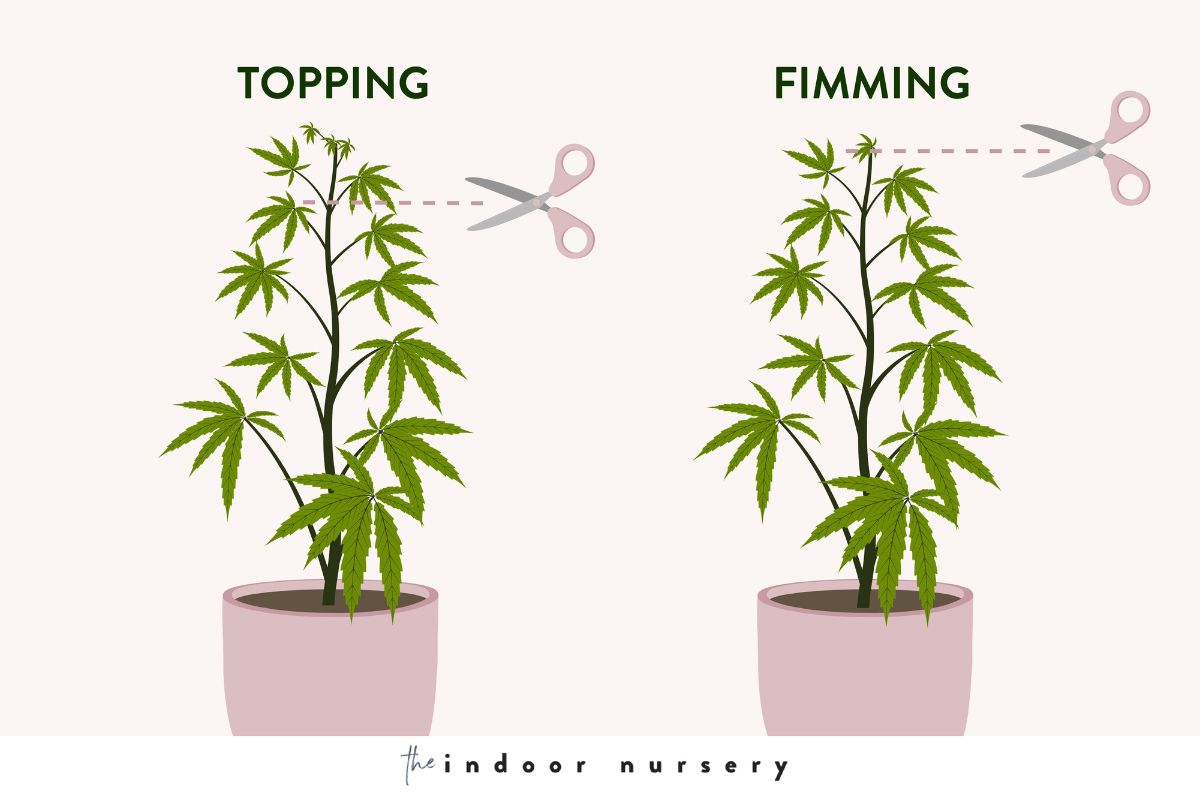
Topping a cannabis plant helps control both the plant’s height and its horizontal spread. With this technique, a grower snips the top of the center stem with the purpose of redirecting energy and growth to its remaining horizontal branches.
After topping your plant, these branches receive more direct light from above and can stretch upwards and outwards.
Topping also helps to manage the aggressive vertical growth marijuana plants are known for: it’s common for these plants to reach up to 5 feet (and easily more without trimming) before they flower, especially when surrounded by other plants.
Keeping the growth low and horizontal in this way results in more nodes and encourages eventual flower growth.
Lollipopping a marijuana plant
Where topping is removing the top of the plant for lateral growth, lollipopping is when the lower branches on the plant are selectively removed so that the undercarriage doesn’t get too leafy, and the plant can focus growth to its upper portion’s branches and leaves.
This is a great video walkthrough from a couple of legends:
The resulting bare stem and leafy top looks like a lollipop. In grow tents, the light comes straight down from above, and although it’s still reflected by the tent walls, lower branches and inner leaves can be shaded by their own upper leaves as well as those of neighboring plants.
Removing the lower branches also keeps the plants from crowding each other in the tent. When the leaves of different plants start to touch, they’ll stop growing horizontally and focus on growing vertically into open space. If they do reach into each other and create a dense underbrush, moisture can build up and mildew, pests, or mold may grow in the shaded area.
When to prune a marijuana plant
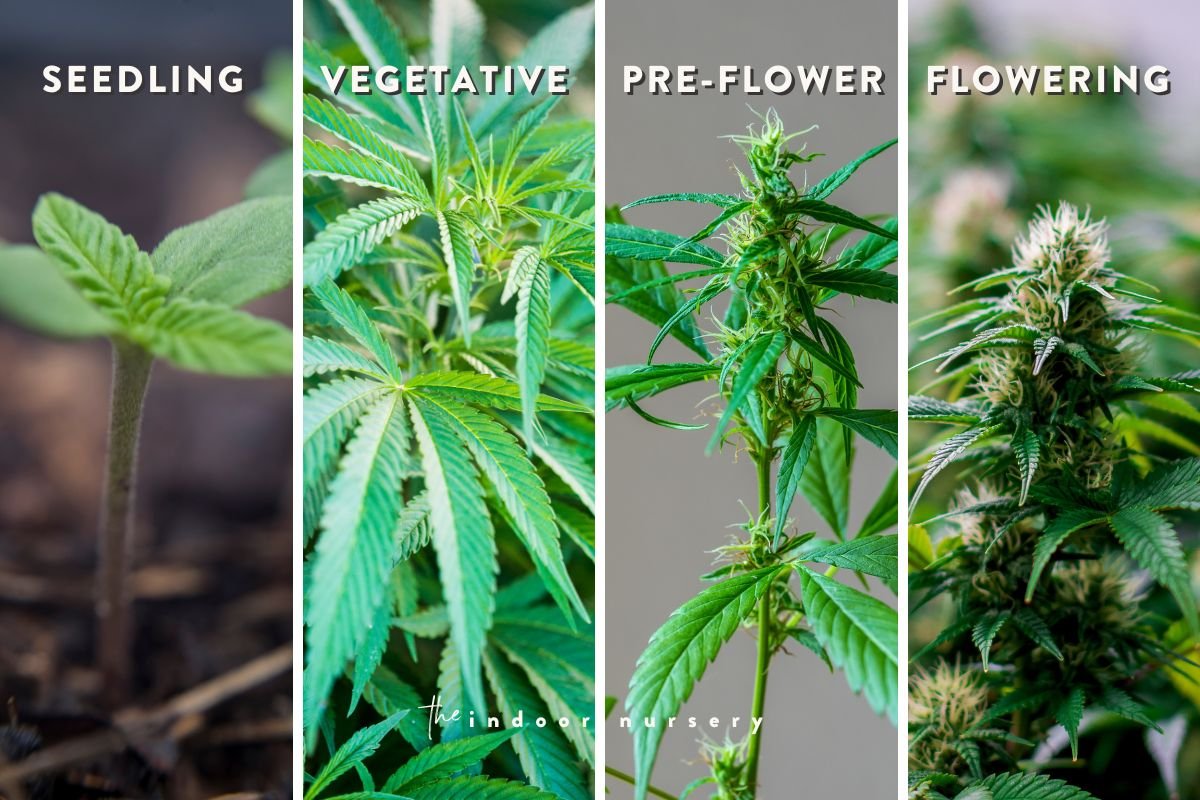
Cannabis growers may have different preferences for when they start to top and prune their plants, but most will begin a few days into the seedling stage (which lasts for two or three weeks) when the plant has at least 3 leaf nodes, or in the early vegetative stage. The plant needs to have some leaves before you start trimming since these are essential for photosynthesis.
You can trim marijuana plants throughout the vegetative stage up to about week 5. Between week 5 and the first week of the flowering phase, only lightly trim to ensure as many flowers come in as possible. When you decide to transition your plant into flowering, reduce your trimming altogether. You should only carefully and selectively trim away large leaves that are shading nodes in order to reduce damage to the bud sites at the base of leaves. Once the plant flips into flowering, it won’t regrow lost leaves since it will be focusing all of its energy on producing flower buds.


How to know when to harvest your marijuana plant
Once the plant hits the flowering stage, it is time to start thinking about harvesting.
Peak harvest time has a short window of opportunity, around five days to a week. You have to get the timing right because if done too early, the THC won’t be potent enough and if you wait too long then there’s little to no THC left.
During the flowering stage, the top of the marijuana plant will grow a bud with white hairs, or pistils, growing out of it. A couple of weeks into this stage you will notice that the trichomes will become dewy with a clear liquid. A magnifying glass or jeweler’s loupe is a handy tool to get a closer inspection of the pistils and trichomes.
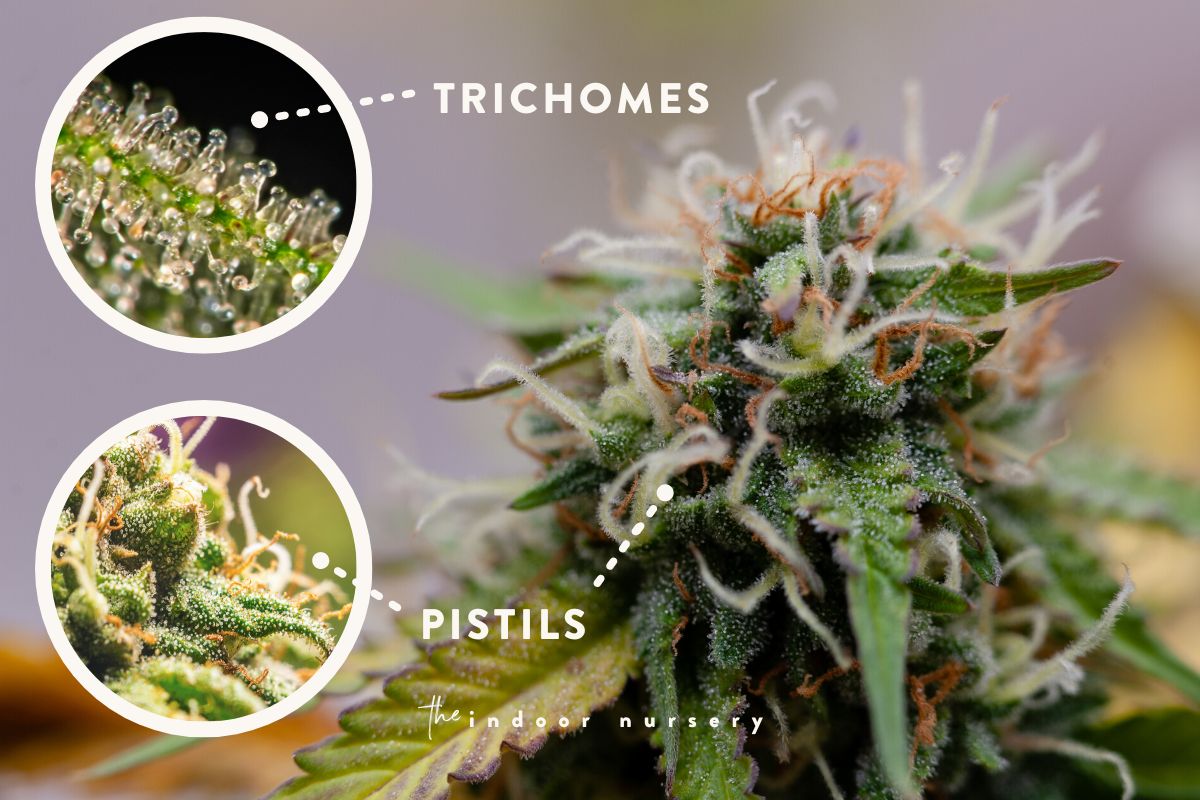
Then the hairs will start to curl in, and the trichomes will turn milky. That’s a visual cue that the plant is about ready to be harvested. Start harvesting when 70% of the hairs have darkened. If harvested at this time, the resulting harvest will have an “up” effect when smoked. The plant will continue to mature, the trichomes will turn into a light amber, and the pistils will curl in even more. Harvesting at this stage will have a “down” effect when smoked. If all the pistils are reddish brown, then the plant is past prime harvesting time.
Always check with a breeder on how to care for a particular strain. Some strains may need to be harvested when pistils are white or have other indicators on when they should be harvested.
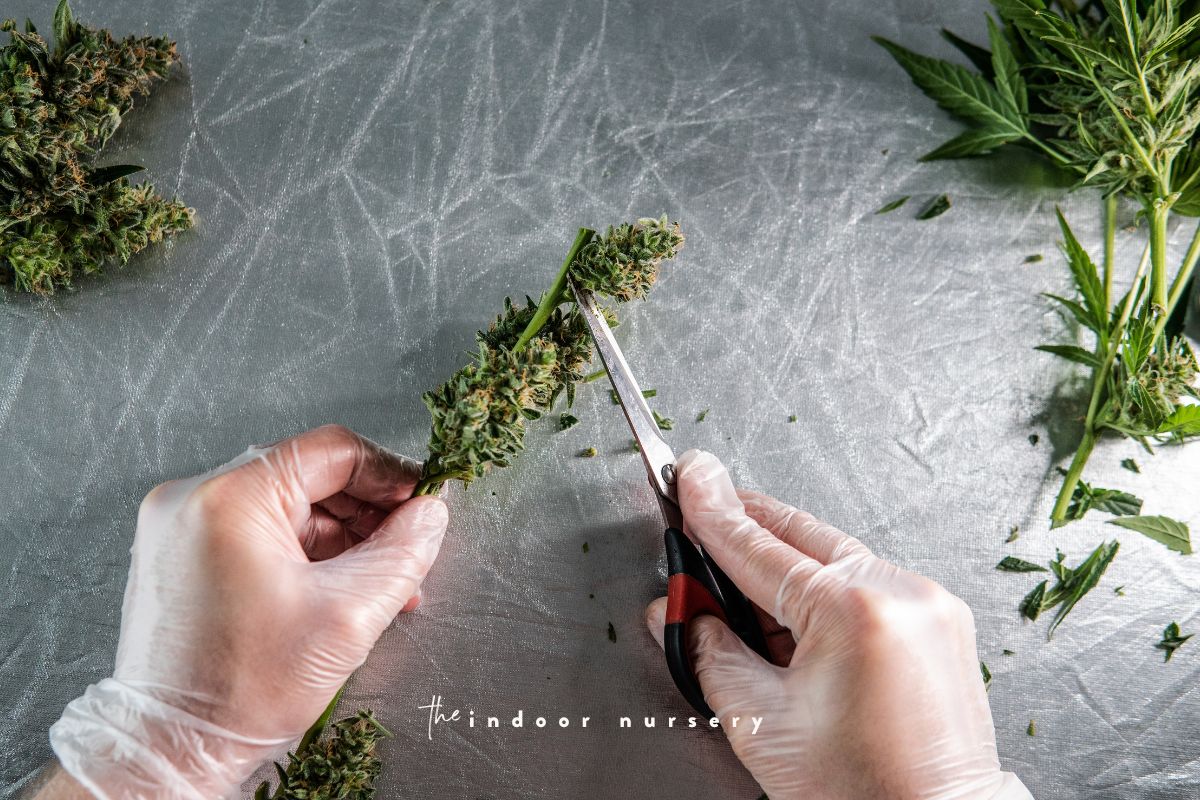
Trimming weed: how to harvest cannabis buds
The term trimming is also used when referring to the last step in preparing marijuana buds to be ready for use: trimming back the leaf material on branches to expose the colas (groups of marijuana flower buds).
When the time comes for this final step, you’ll need to clip branches away from the main stem and dry them for a few days. At this point, the leaf material around the cannabis buds will be ready to be trimmed away.
- Wet trimming, or trimming weed without giving the branches time to dry out, can result in moisture buildup in your scissors, dulling the blade and creating not-so-clean cuts.
- Trimming dry buds after they’ve had a few days to sit is easier since the cannabis leaves will crumble off without leaving any moist residue.
You should take extra care when trimming buds to reduce damage to the trichomes on the flowers. Trichomes are the hair-like glands on the buds that secrete resin, which contains the cannabinoids THC, CBD, and over a hundred other compounds that make the green magic happen when consumed.
The flower buds grow at the stem nodes along the branch, which you’ll see clearly as you cut more of the outer leaves and stalk material back. Trimming the fan leaves and stalk material is important because they don’t contain the compounds marijuana is known for, and typically contribute to a harshness if mixed in with smokable marijuana. The exception here is the sugar leaves or the leaves closest to the buds that do indeed have trichomes and resin on them. Since you’re hand trimming, it’s easy to notice and set those in a separate pile away from the unusable material.
Use small pruning shears to make the most exact cuts and reduce damage to the plant.
Hold the branches at the bottom of the stem when preparing to make cuts to avoid touching the buds themselves with your hands. Be sure to use sharp scissors for the cleanest cuts, and keep some paper towels handy to wipe off the scissors as you go. Sharp, clean blades will help you make precise cuts that don’t waste any of the bud’s flower material or damage the resin-soaked trichomes.
This is how to do it:
- Cut the plant down at the base.
- Start trimming at the bottom of your plant and clip the fan leaves and smaller secondary leaves away in a spiral, making cuts in the direction of the grain of the leaf growth.
- Cut the entire leaf, including the leaf stem (petiole), and toss the cannabis trim into a paper bag.
- Chop branches into workable sizes that are easy to hold.
- Trim the sugar leaves around the bud, and try to cut it near the base. Place sugar leaves on a tray.
- Hang the branches to dry.
Male Harvest
Once you identify the gender of marijuana plants, it is best to separate the males from the females. Males can start producing pollen two weeks into the 12-hour day/night schedule. And pollen sacks begin opening three to six weeks into the flowering stage. Place them in a separate area with an air filter to make sure that the pollen doesn’t travel into other areas.
THC in male flowers is at peak levels when the flowers are visible but not yet open. Harvest the buds before the pollen is released. The pollen release speeds up degradation which causes the flowers to fall.
If a male plant is near a female plant, be extra careful when harvesting. Spray any visible pollen sacks with water. Then cover the male plant with a plastic bag and seal it closed before cutting it at the base. Trim weed cuttings away from female plants.
Sinsemilla Harvest
Sinsemilla refers to an unfertilized female weed plant. It is also a growing technique that creates a seedless weed plant with high THC content. Its harvest is usually six to 12 weeks into the flowering stage, after changing to a 12-hour light schedule.
In general, indoor marijuana varieties are bred so that the whole plant hits peak potency and is ready to harvest at the same time. These varieties have a four to five-week bud formation before growth slows. Harvesting is done one to two weeks after growth slows down.
Harvesting can be done based on the color of the pistils and the trichomes:
- Early Harvest: pistils change from white to amber, trichomes are clear
- Late Harvest: pistils change from brown to brownish-red, trichomes are amber
- Peak Harvest: pistils change from amber to brown, and trichomes are cloudy
How to manicure cannabis buds post-harvest
After harvesting a marijuana plant comes separating the buds from the stem, branches, fan leaves, and sugar leaves. The other parts of the plant are harsh to smoke and do not have as much THC. Trimmed cannabis buds make for an aesthetically pleasing final product.
There are two ways to manicure buds – wet trimming or dry trimming.
Wet trimming
Many growers prefer to trim a plant right after harvesting and before drying. Known as wet trimming, the fan leaves are cut off, the buds are trimmed, and then the cutting is hung for drying.
Wet trimming helps to lower the moisture content of the cutting, prevent mold, and have an even dry.
Choosing to do wet trimming means you will be covered in sticky trichomes at the end of the day. You can use rubbing alcohol or coconut oil to clean up.
Dry trimming buds
In dry trimming, after the plant is cut down the whole thing is hung up to dry. You can do this in dry, low humidity, and arid areas and if you have the space.
Dry trimming usually takes a couple of days to dry since the whole plant is intact. You’ll know if the plant is dry when the stems snap when bent.
Trimming a marijuana plant
Trimming cannabis plants are done the same way regardless of it is a wet or dry trim. The trimming process is time consuming so grab a comfortable chair and be ready to spend a couple of hours to hand trim buds.
Equipment needed:
- Ergonomic scissors for trimming
- Small knife to scrape resin from scissors
- Latex gloves to protect your hands (I like these eco-friendly gloves)
- Rags
- A table or clean surface
- Comfortable chair
- Tray for trimmed buds
- Bins for leaves and branches
- Rubbing alcohol or coconut oil
Steps:
- Cut the plant down. (If you’re wet trimming, then go straight to step 2. If you’re dry trimming, then hang your cut plants to dry first.)
- Use trimmers and cut the fan leaves and secondary leaves starting with the biggest first, working your way inwards to the center of the stem.
- Trim to the top of the stem.
- Cut buds from branches, also called bucking.
- Trim the sugar leaves around the bud.
- Break up big buds.
Use rubbing alcohol or coconut oil to remove the sticky trichome residue. Once the extra material is removed, allow the trimmed buds to dry and then cure it before use.
Drying and curing cannabis buds post-harvest
The drying process helps convert the THC from green marijuana to a more potent form. But, it should be done slowly and at the optimal temperature so that it is nice to smoke and tastes sweet.
Best conditions for drying bud
You should aim to dry the plant over five to seven days which will dry it evenly and minimize THC decomposition. If dried quickly, it tastes “green” and doesn’t burn evenly. The extra effort results in a better smoking experience.
Ventilation and circulation fans will keep humidity and heat at the proper level. In humid areas, a dehumidifier is handy. While an air conditioner may be necessary for warmer climates or a heater in cooler temperatures. Make sure that fans are not blowing air onto the plants which will cause uneven drying.
Ideal temperatures for growing weed are between 65 and 75°F (18-24°C) and humidity from 45 to 55 percent.
| Temperature | 65-75 F (18-24 C) |
| Humidity | 45-55% |
| Light | None |
| Handling | Minimum |
| Leaves | Remove at harvest |
| Manicured buds | Hang until dry |
When the temperature is below 65°F, humidity climbs quickly. When the humidity hits 80 percent or more, it extends drying time and makes the buds susceptible to mold.
Buds dry too fast at temperatures above 75°F, and humidity easily falls below 50 percent too. If the drying temperature is above 85°F the fast drying time makes the buds crispy, easy to crumble, and harsh to smoke. When humidity is 30 to 40 percent, the plants retain more chlorophyll which makes them taste “green” when smoked and lose flavor and odor. Having the right hygrometer and thermometer is key to getting the temperature and humidity right.
Drying time usually lasts five to seven days. The plants are dry when the stems break when bent and the bud feels dry to the touch. Then it is time for curing.
Curing bud
Curing is necessary because the buds will still have some moisture which affects potency and taste. It will remove the remaining moisture and helps convert THC into a psychoactive form. The buds will also burn evenly and have an even glow when cured properly.
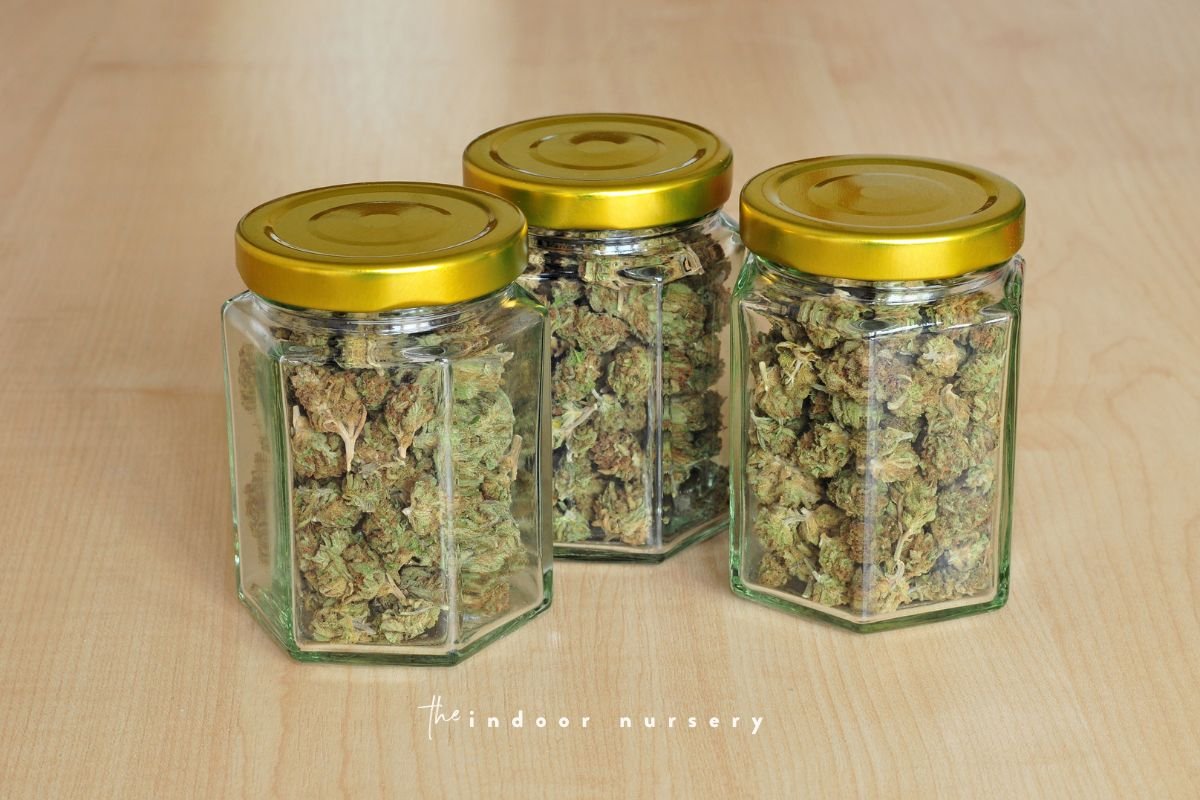
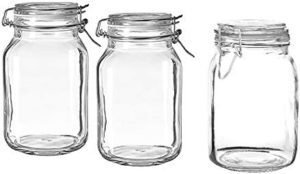
Buds should be placed in glass jars with a tight seal. Canning jars work best and avoid plastic baggies at all costs. Glass doesn’t impart odors or flavors and keeps the resin glands intact. It should be placed in a cool, dry, and dark environment to cure. Open the container for a couple of hours each day. It will be ready to smoke in a month.
How to fast-dry cannabis bud
We don’t recommend drying weed quickly but for those times when you need to do it fast below are some options:
- Microwave oven method: at 50 percent power, heat cut-up buds and leaves in 15-30 second bursts. Check for dryness, stir, and repeat until dry.
- Envelope/paper towel method: spread dry buds and leaves evenly in an envelope or between paper towels. Place on top of a refrigerator, radiator, or other appliance for a couple of hours or overnight until dry. Place in an airtight container to sweat then return to the envelope or paper towels and place on top of the refrigerator to totally dry.
- Tin foil and light bulb method: cut the foil into a 12-inch square and arrange the dry buds and foliage on top. Hold it over a 60-100 watt light bulb and stir until it dries. It should take one to three minutes to dry.
- Oven method: preheat oven to 150°F (65°C). Sprinkle cut-up buds and leaves on a cookie sheet and dry for 10-15 minutes. Stir occasionally and check for dryness. Temperatures have to be kept below 200°F so that the THC will not evaporate.
- Dehydrator method: place dry buds and foliage in the dehydrator for 24-48 hours.

How to freeze-dry cannabis bud
Dry ice can be used to freeze-dry cannabis at home. It lessens the drying time and preserves resin better.
- Place dry ice in the bottom of a Styrofoam container.
- Add an equal amount of bud on top.
- Cover and place in the freezer. Poke some holes in the cover so the gas can escape.
- Check it every 12 hours until the dry ice is gone. If the buds are not yet dry, repeat the process.
Packaging and storage
To preserve the taste, aroma, and potency of cannabis it is best to store it in an airtight container. Vacuum sealers can be used or canning jars can be used to store weed.
Arrange the cured buds in a large jar or vacuum bag and seal them. Place the airtight container in the refrigerator or a cool, dark, and dry environment. Do not place it in the freezer, it harms the resin glands.
How to prepare for the next grow
It is totally possible to get more than one harvest from your weed plant. You will need to harvest seeds or regenerate a female plant.
Harvesting seeds
Home growers can pollinate one or two branches to harvest cannabis seeds for the next grow.
Collect the pollen from male plants. It is easier to gather after it falls from the flower pods onto the leaves. Then sprinkle the pollen on the flowers of the female plant. It takes six to eight weeks for cannabis seeds to mature after pollination. Seeded branches mature until ripe which takes about one to two weeks. Once mature, rub the seeded buds between your hands over a container. Then rub the seeds to remove calyxes and separate them from the chaff. It is easier to work with a dry bud rather than a freshly cut one.
Dry the cannabis seeds for a month or so before planting. Store them in a film canister and place them in a dry, cool, dark place. You can also store it in the freezer, and let the seeds thaw completely before planting.
Rejuvenating females
During the harvest, leave a couple of the lower branches with the fan leaves and small leaves on a female plant. Then rejuvenate it with an 18-hour day and 6-hour night photoperiod. At this point, the female will revert back to the vegetative growth stage.
For the next four to six weeks use a high-nitrogen fertilizer to promote leaf growth. Let it grow until you want to start the flowering stage.
More about cannabis
- How To Treat A Magnesium Deficiency In Cannabis
- It’s Not O-K: Potassium Deficiency in Cannabis
- How to harvest cannabis (and use the entire plant)
- Male Weed Plant Stages: Don’t Ruin Your Crop
- How To Decarb Weed For Homemade Cannabis Products
- Loving the Ladies: Female Weed Plant Stages
- Patience is a Virtue: Curing Buds for Best Taste
- Understanding weed light cycles: Get the most from your harvest
- When to switch to flower nutrients for high cannabis yield
- How to make live resin at home, step-by-step

Marquis *wants* to know how to keep happy and healthy plants, but had a hard time finding information that wasn't written by just another copywriter. After nearly losing one too many plants, it was time to take matters into her own hands. A team of plant scientists and nursery hands was brought together and The Indoor Nursery was born.